Sending Messages via Slack API
- 1. Overview
- 2. Creating Slack Apps
- 3. Configuring Slack Apps in SQLMessenger
- 4. Sending Messages and Files to Slack Members
- 5. Using Variables to Dynamically Specify Message Recipients
- 6. Importing Slack Workspace Members & Channel Lists to Local Database
- 7. Receiving and Processing Slack Messages
- 7.1 Configuring the Slack App and Enabling WebSocket Functionality
- 7.2 Configuring Slack App and WebSocket in SQLMessenger
- 7.3 Triggering Tasks When Messages Are Received
- FAQ
1. Overview
SQLMessenger 2.1 and above enables sending messages (e.g., text, images, files) to members of your Slack workspace via the Slack API. This article guides you through configuring a Slack API Sender in SQLMessenger.
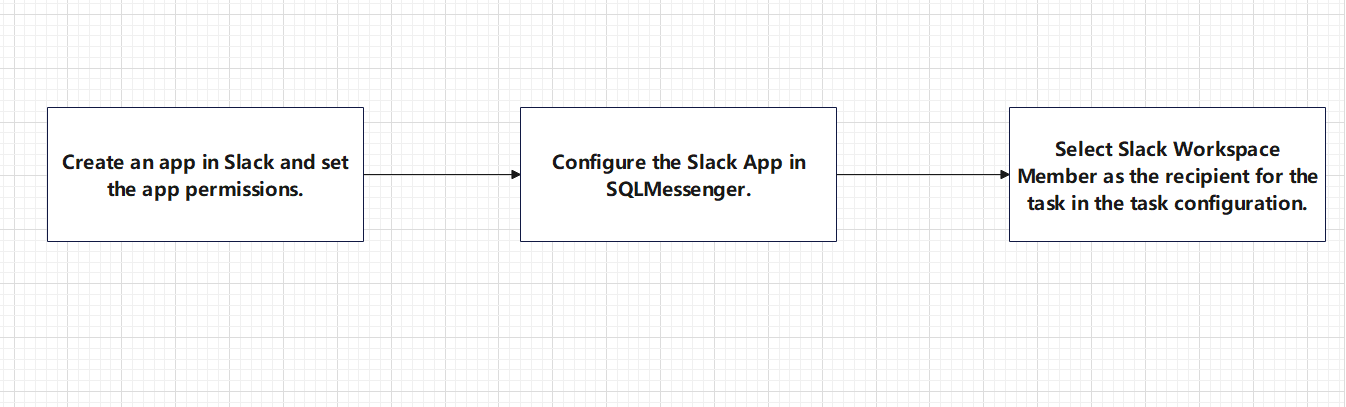
Slack App Configuration Process in SQLMessenger
2. Creating Slack Apps
Before configuring the Slack API Sender, you need to create a Slack App in your Slack workspace. If you have already created a Slack App, please skip this step.
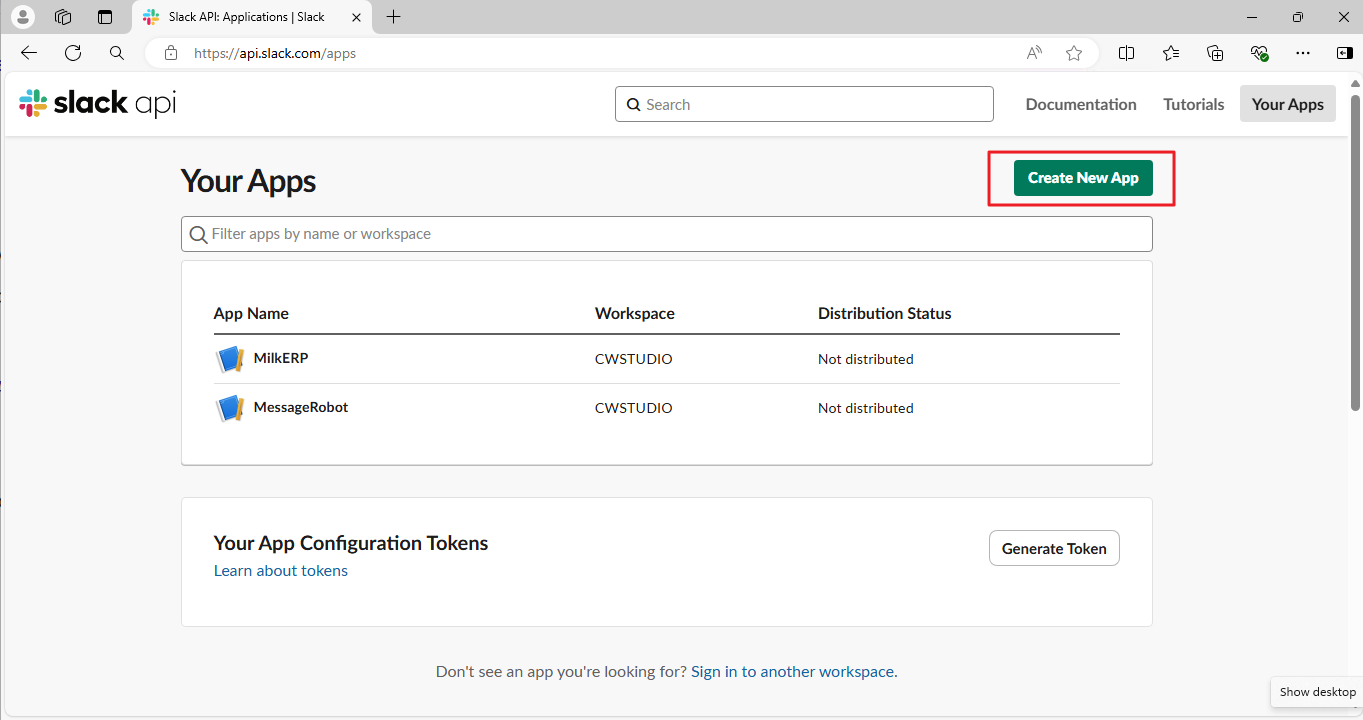
Step 1: Log in to the Slack App management page (https://api.slack.com/apps) as workspace administrator, then click the Create New App button.
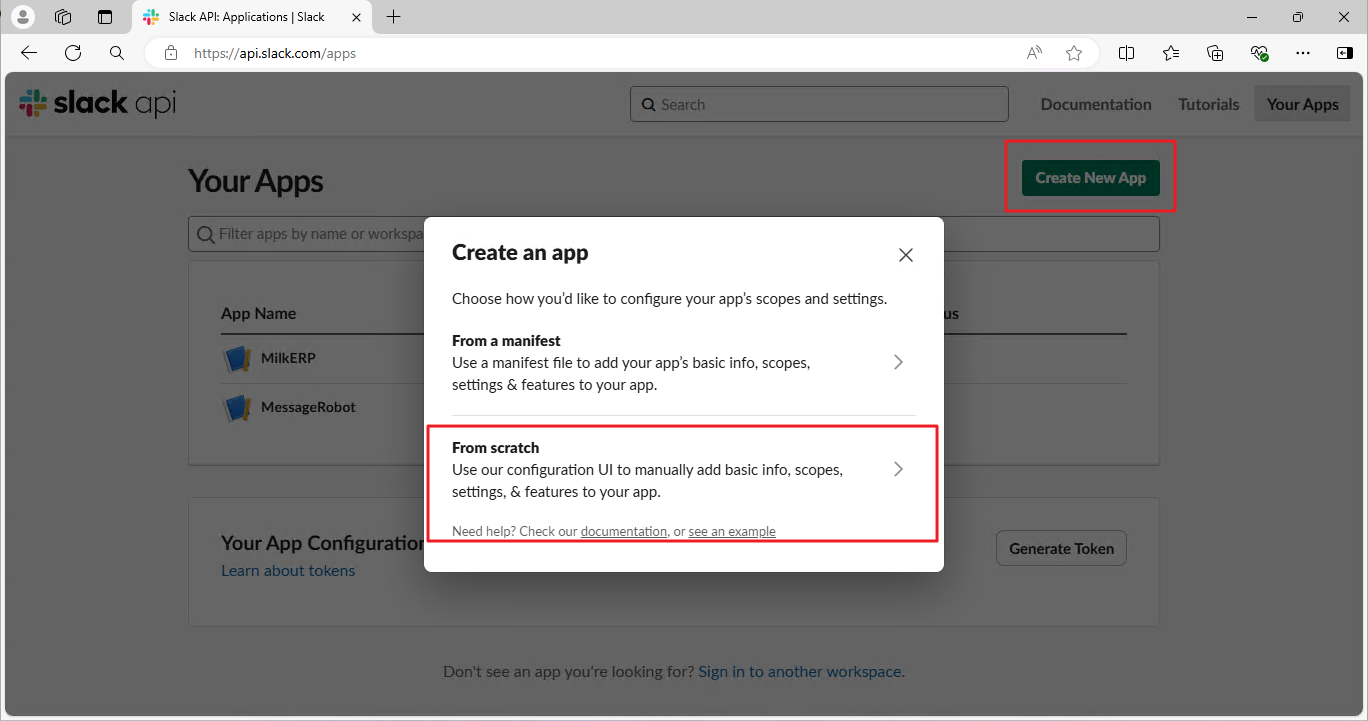
Step 2: Click From scratch.
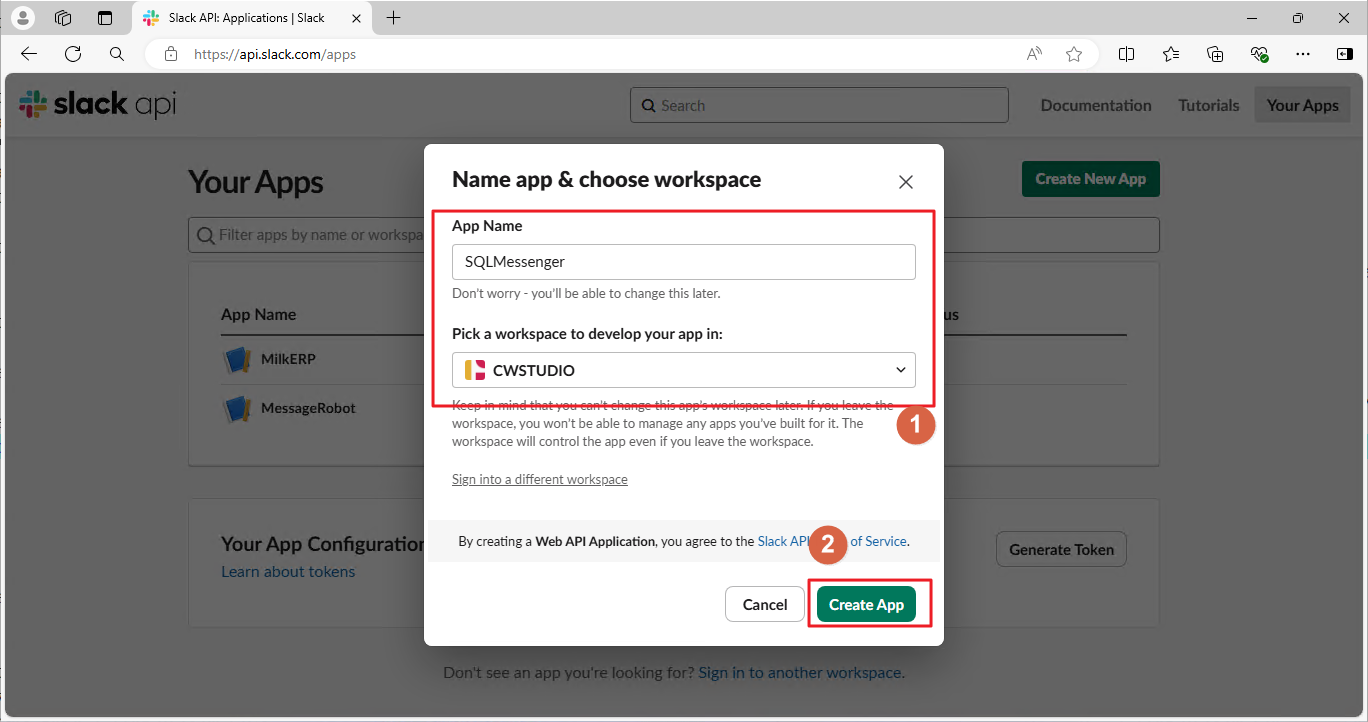
Step 3: Enter the App Name, pick a workspace, then click the Create App button.
Step 4: Click the OAuth & Permissions menu, scroll down to the Scopes section, then click Add an OAuth Scope and add the required permissions for both Bot Token and User Token.
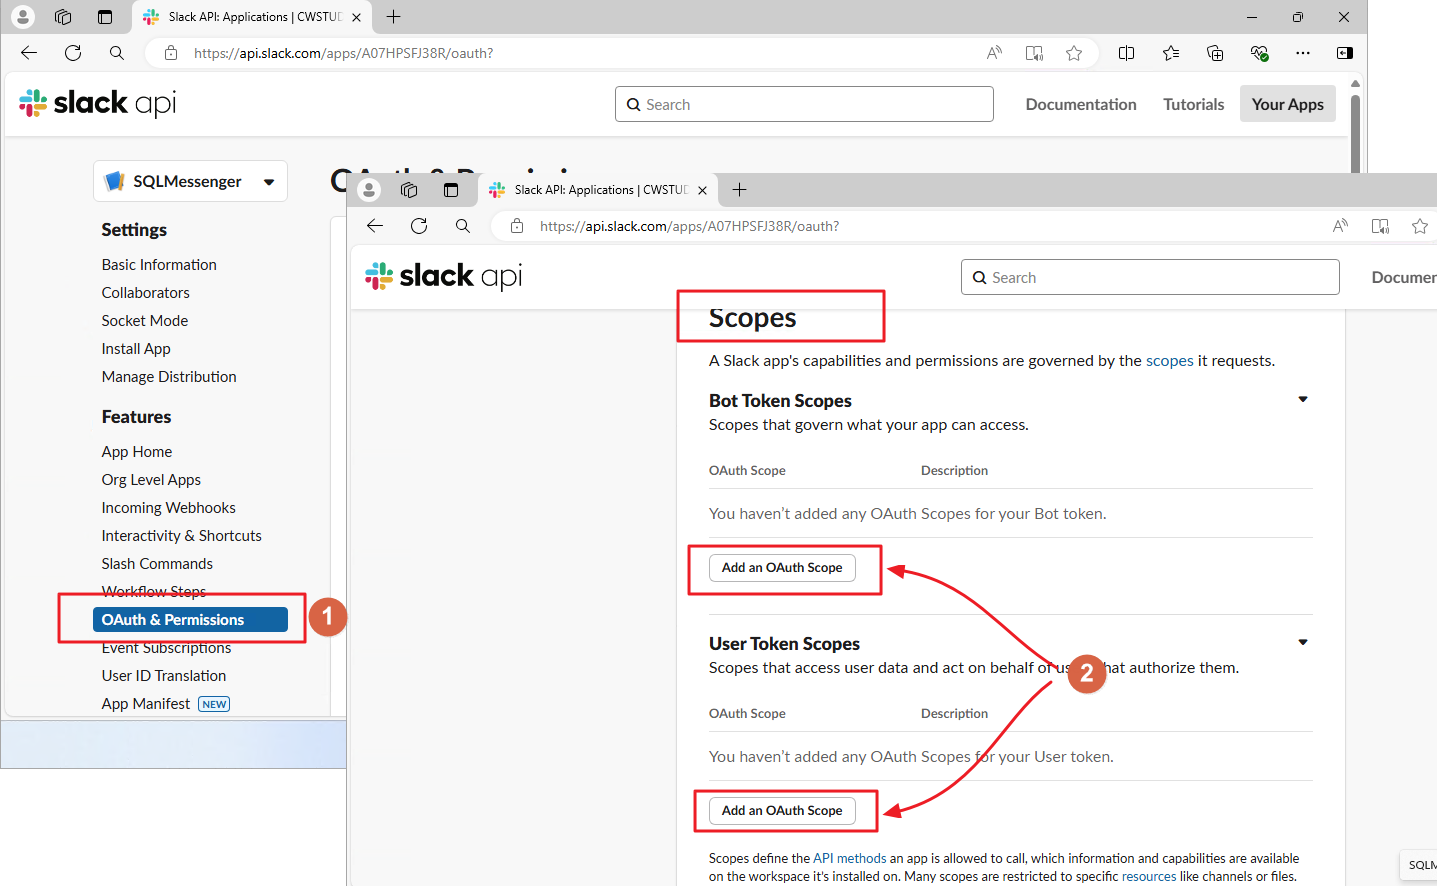
To ensure SQLMessenger works properly with your Slack App, add the following permissions to the app:
| channels:read | View basic information about public channels in a workspace |
| channels:write | Manage a user’s public channels and create new ones on a user’s behalf |
| chat:write | Send messages on a user’s behalf |
| files:write | Upload, edit, and delete files on a user’s behalf |
| groups:read | View basic information about a user’s private channels |
| groups:write | Manage a user’s private channels and create new ones on a user’s behalf |
| im:read | View basic information about a user’s direct messages |
| im:write | Start direct messages with people on a user’s behalf |
| mpim:read | View basic information about a user’s group direct messages |
| mpim:write | Start group direct messages with people on a user’s behalf |
| users:read | View people in a workspace |
| users:read.email | View email addresses of people in a workspace |
Step 5: After adding the permissions, scroll up to the OAuth Tokens section and click the Install to [Your Workspace Name] button.
![After adding the permissions, scroll up to the OAuth Tokens section and click the Install to [Your Workspace Name] button](images/32-10.png)
Step 6: Click the Allow button to complete the app installation.
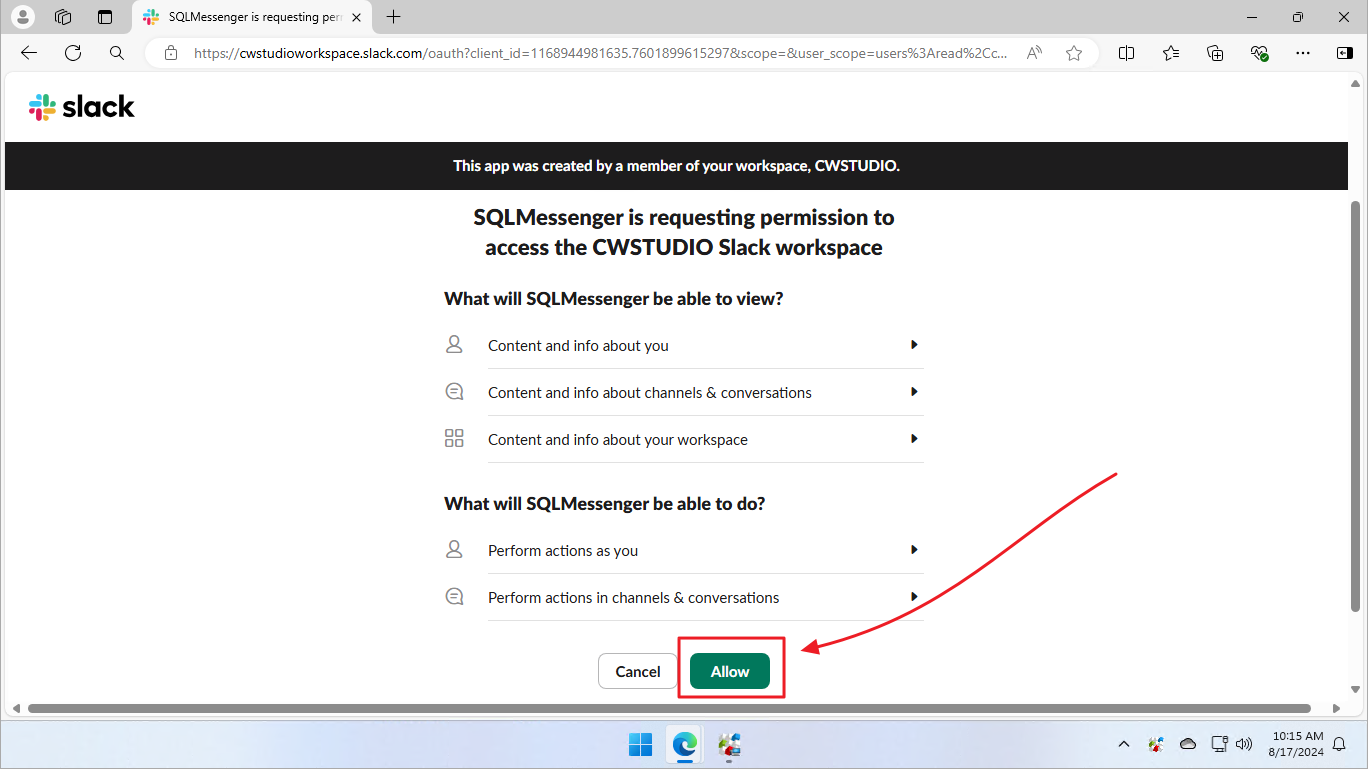
Note: If you are not a workspace administrator, ask the administrator to complete the app installation.
3. Configuring Slack Apps in SQLMessenger
Once you have created a Slack App, you must configure it in SQLMessenger.
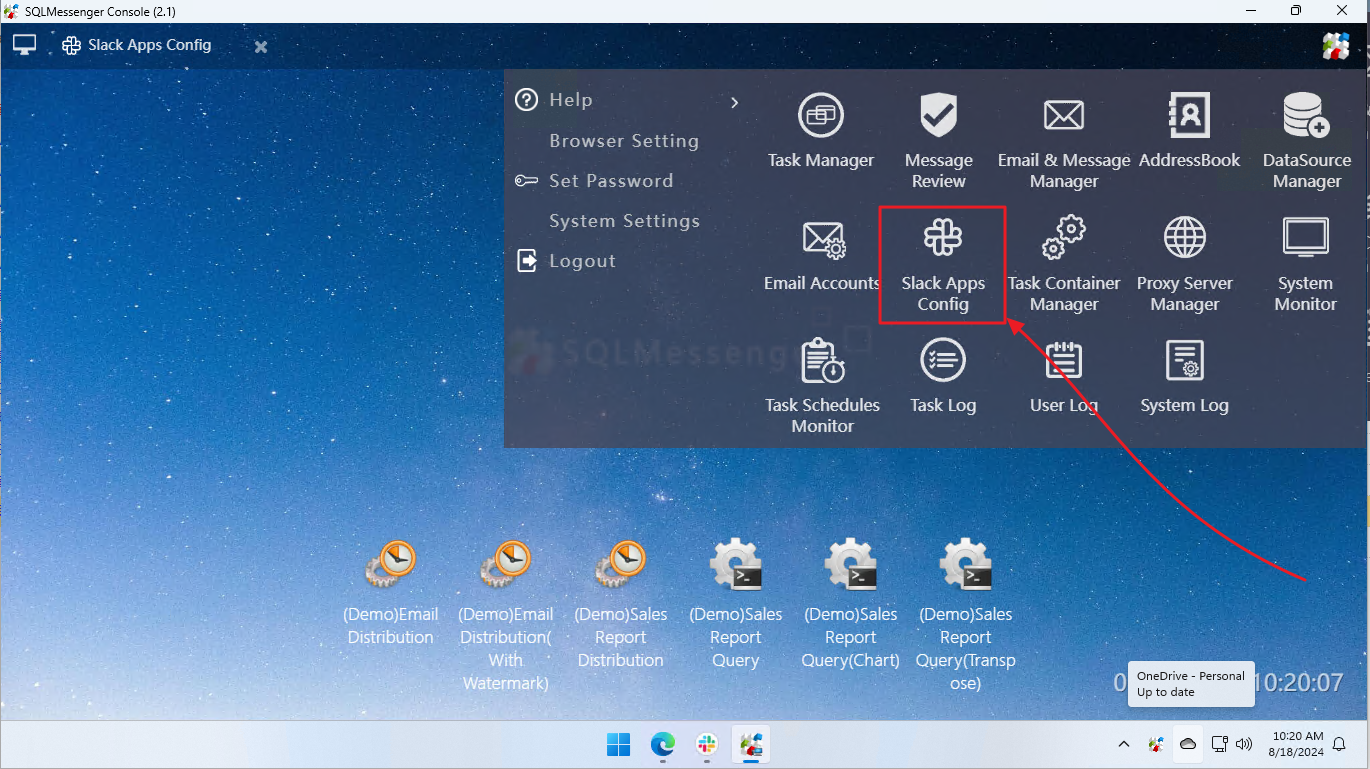
Step 1: Click the Slack App Config icon in the MainMenu.
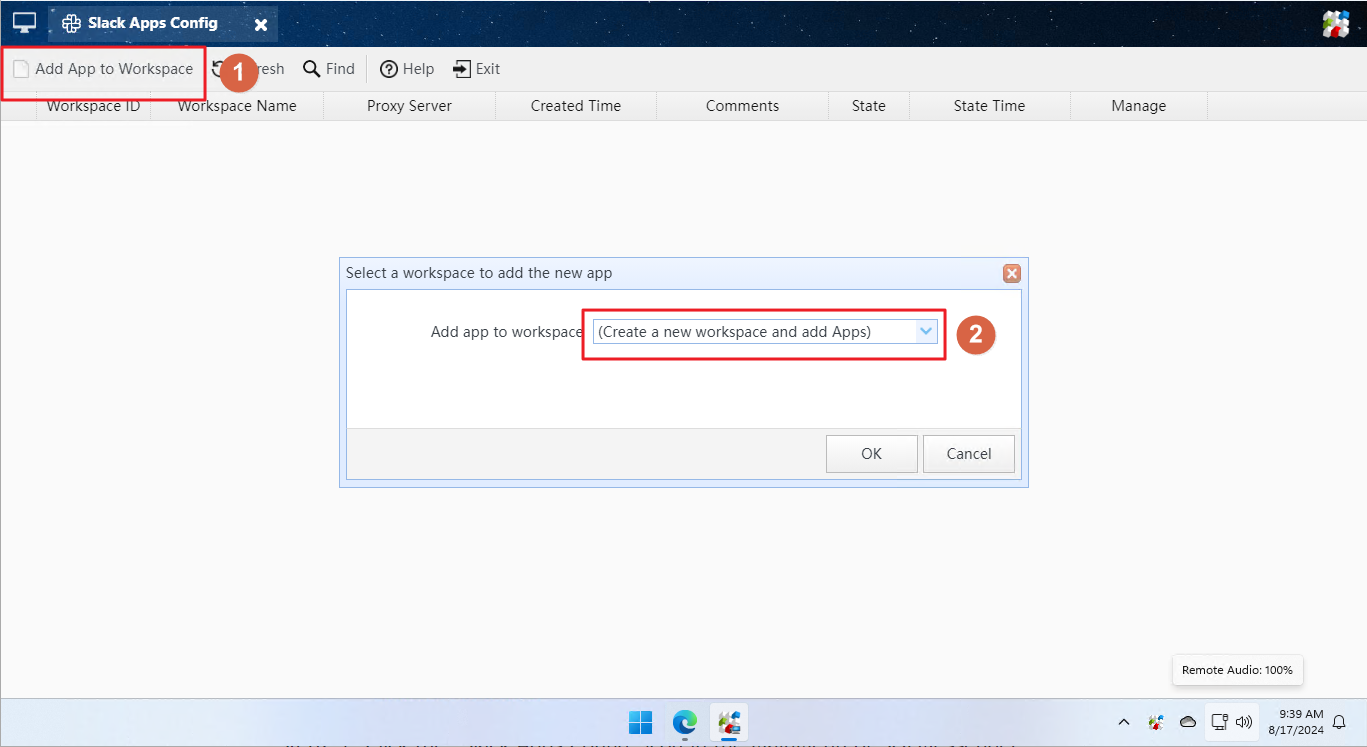
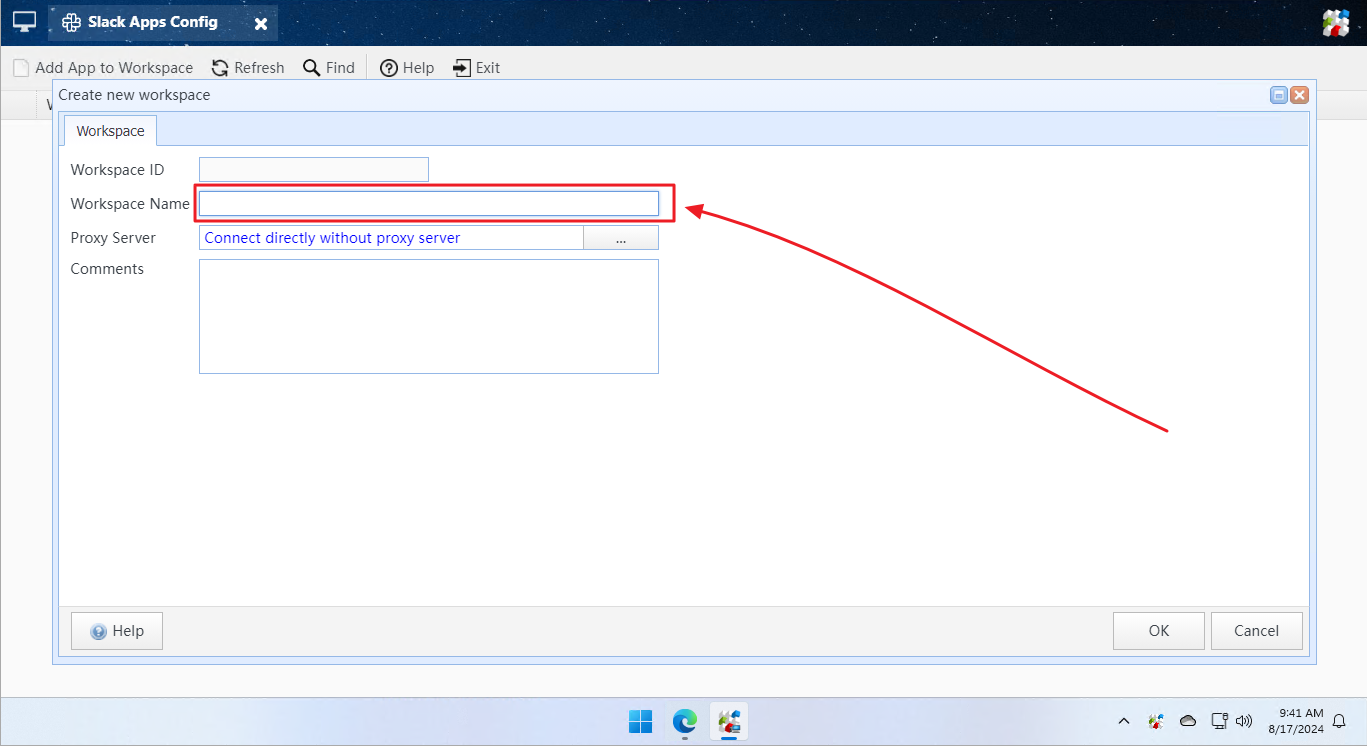
Step 2: Click the Add App to Workspace button, and select the Create a new workspace and add Apps option.
Step 3: Enter the name of the workspace and click OK.
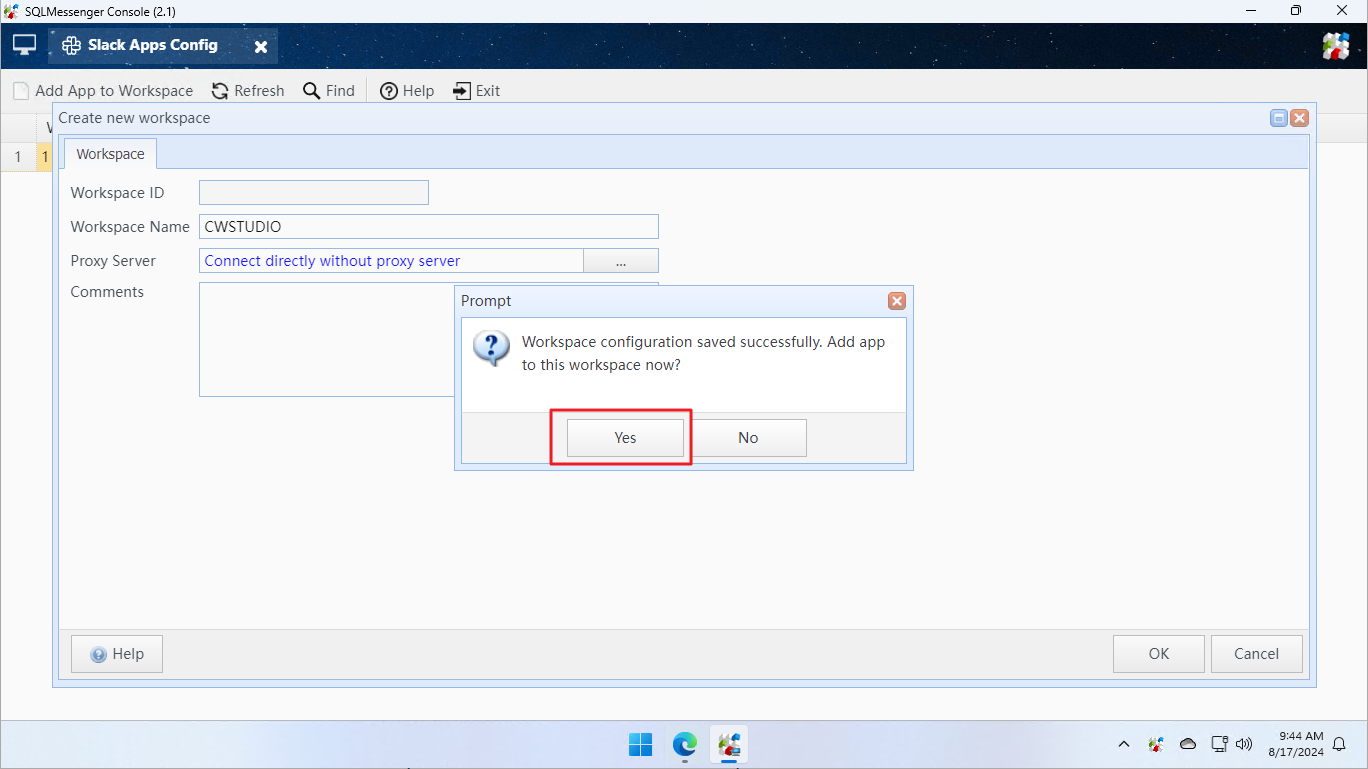
Step 4: After saving the workspace information, the system prompts you to add the app immediately. Click Yes.
Step 5: Select the app type, then enter the app name and corresponding OAuth token.
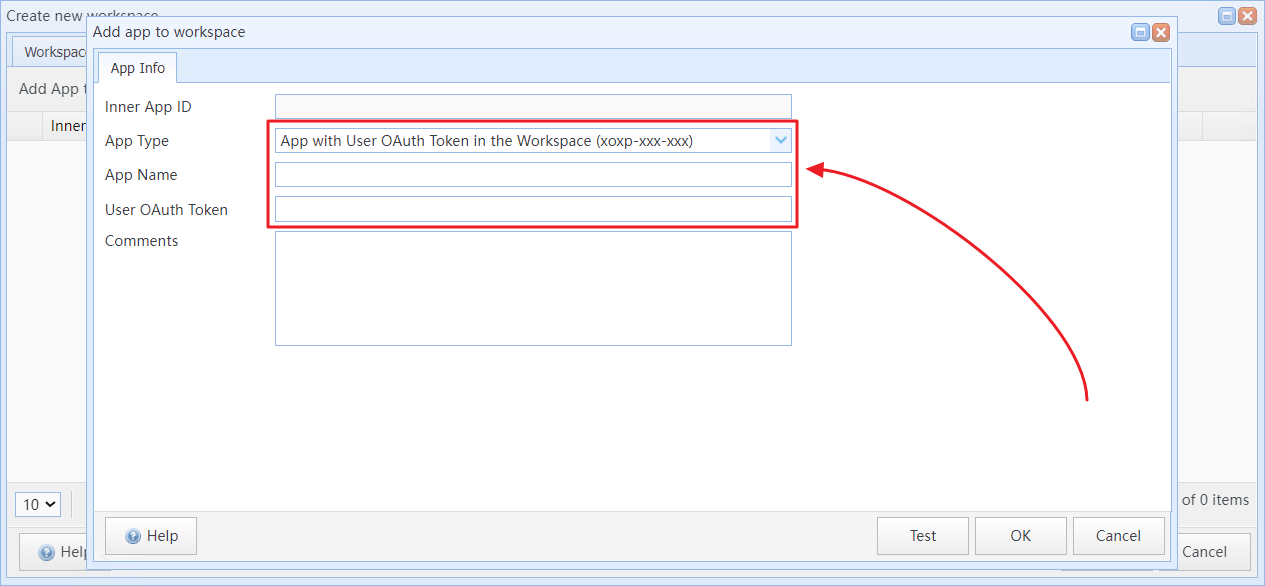
Tips: The app name must be unique within SQLMessenger.
Note: You can obtain OAuth tokens by going to the OAuth & Permissions page in your Slack app dashboard, then locating the OAuth Tokens section to view your User OAuth Token and Bot User OAuth Token.
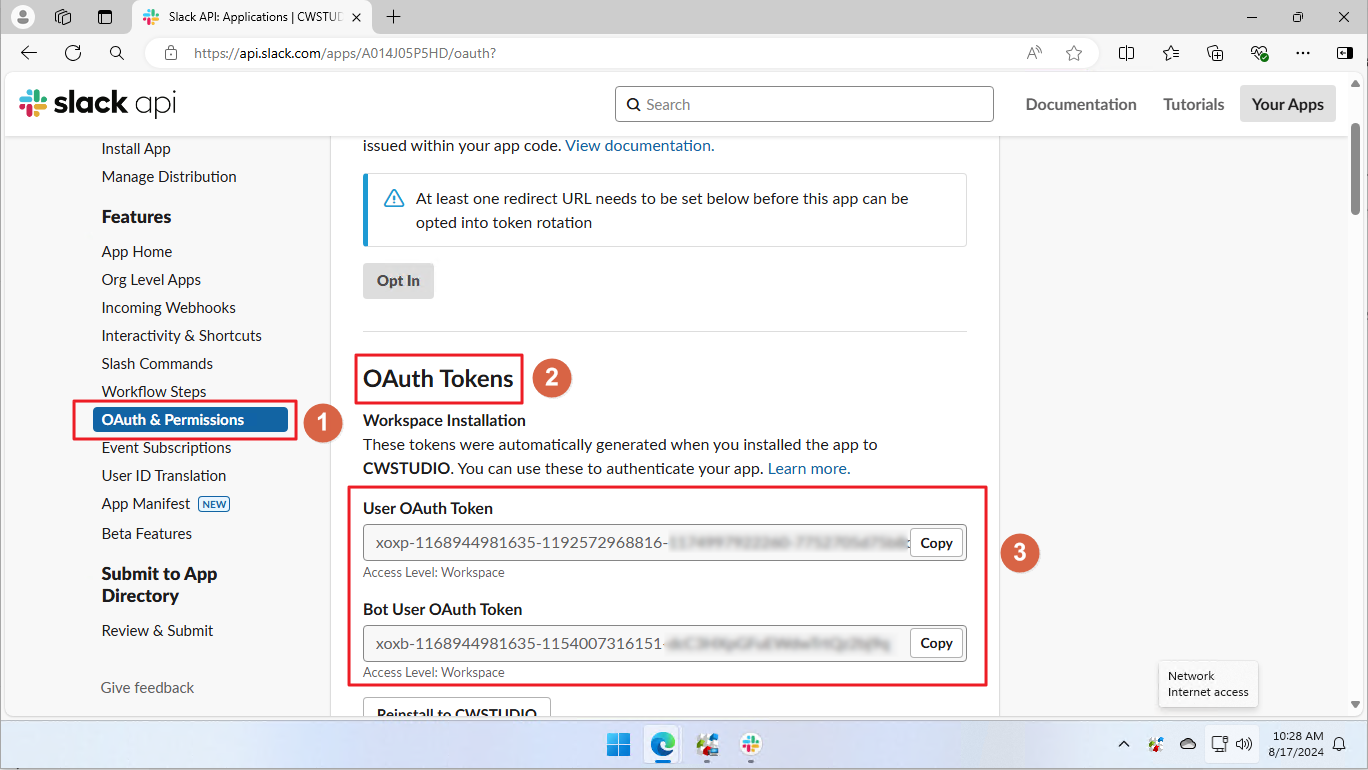
Find the User OAuth Token and Bot User OAuth Token
Step 6: After entering the OAuth token, click Test to send a test message to your Slack workspace via this app.
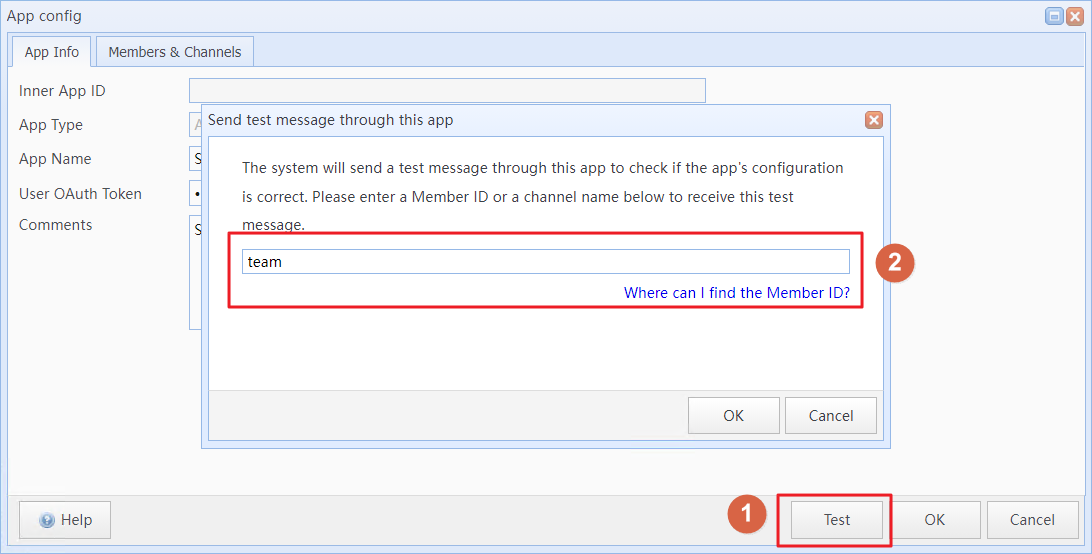
Tips: Enter a channel name or member ID in the Recipient Member ID for Test Message input box, and the system will send test messages to the specified channel or user.
Step 7: After entering the application details, click OK to save the configuration. When prompted to import member and channel lists to the local database, click Yes.
Tips: SQLMessenger imports workspace members and channels into the local PostgreSQL database for easy recipient selection during task configuration.
4. Sending Messages and Files to Slack Members
To send messages or files to Slack workspace members, select Slack members as recipients on the Send to Slack tab during task configuration.
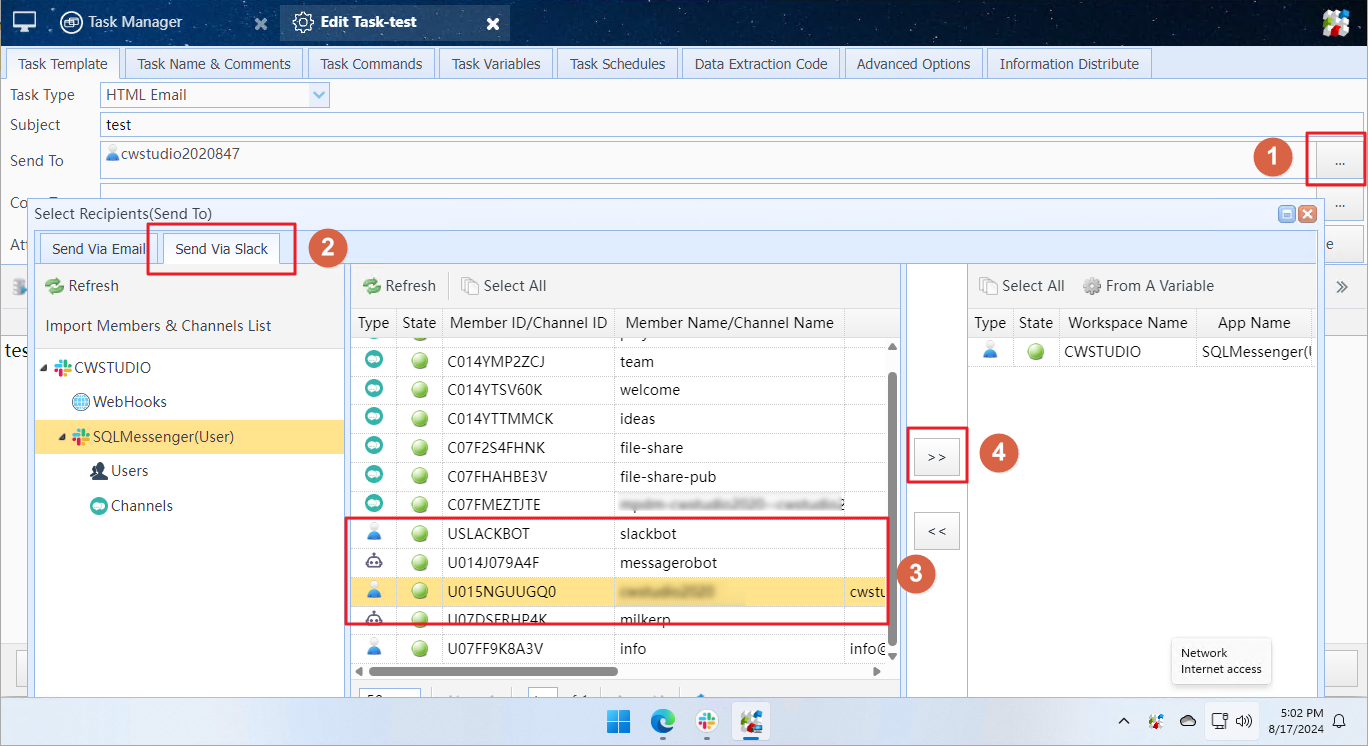
Select Slack workspace members as recipients
Note: If you select Slack workspace members as recipients on the Send Via Email tab, messages will be delivered to their email inboxes.
Tips: When sending messages via Slack API, the body content is converted into text messages by default. You can also convert it to images or PDFs and send them to Slack workspace members by enabling relevant options in body template settings.
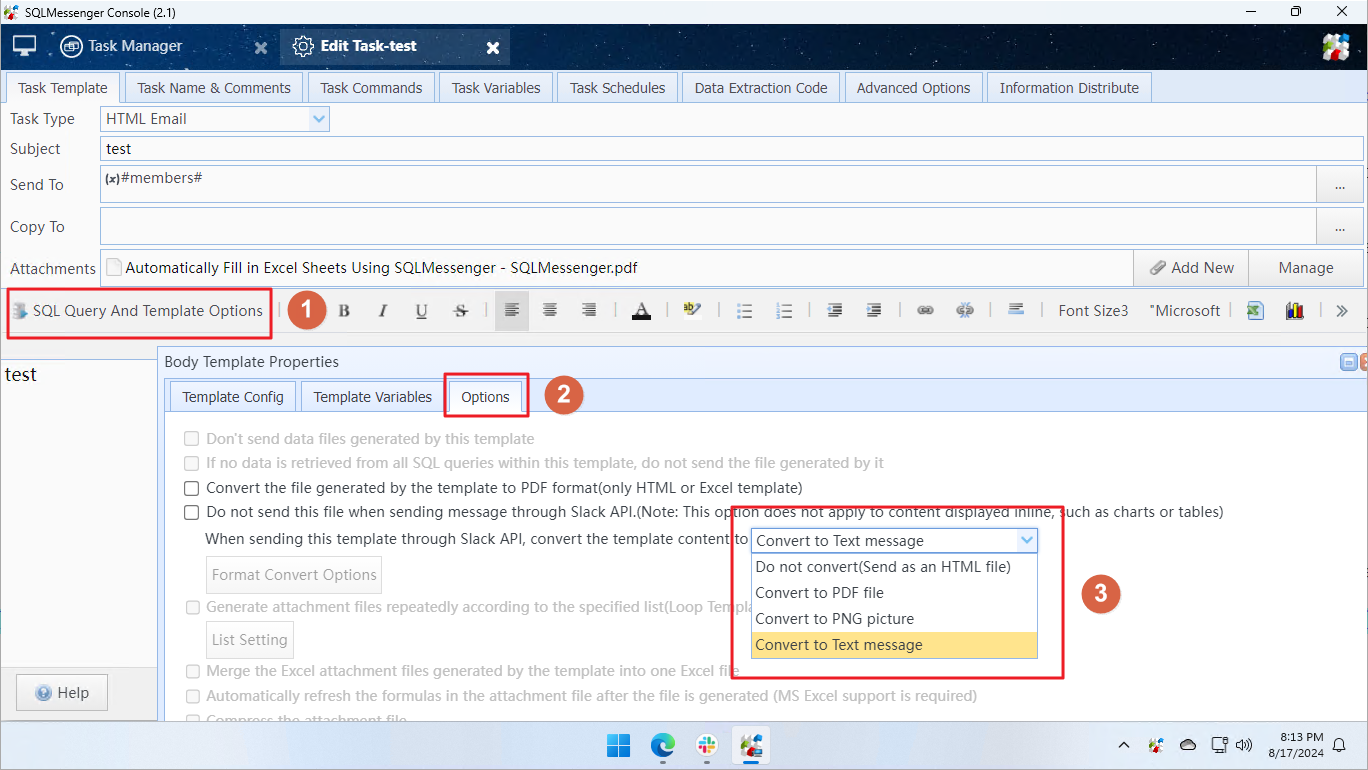
Convert the email body into a PNG image or PDF file when sending it to Slack workspace members
5. Using Variables to Dynamically Specify Message Recipients
In SQLMessenger, you can use variables to dynamically determine message recipients during task execution. For example, you can retrieve a recipient list from a database, Excel spreadsheet, or CSV file and send messages to them. Below, we'll walk you through how to dynamically set recipients with an example.
Step 1: Create a variable in the task to retrieve recipient Slack member IDs from a table during task execution.
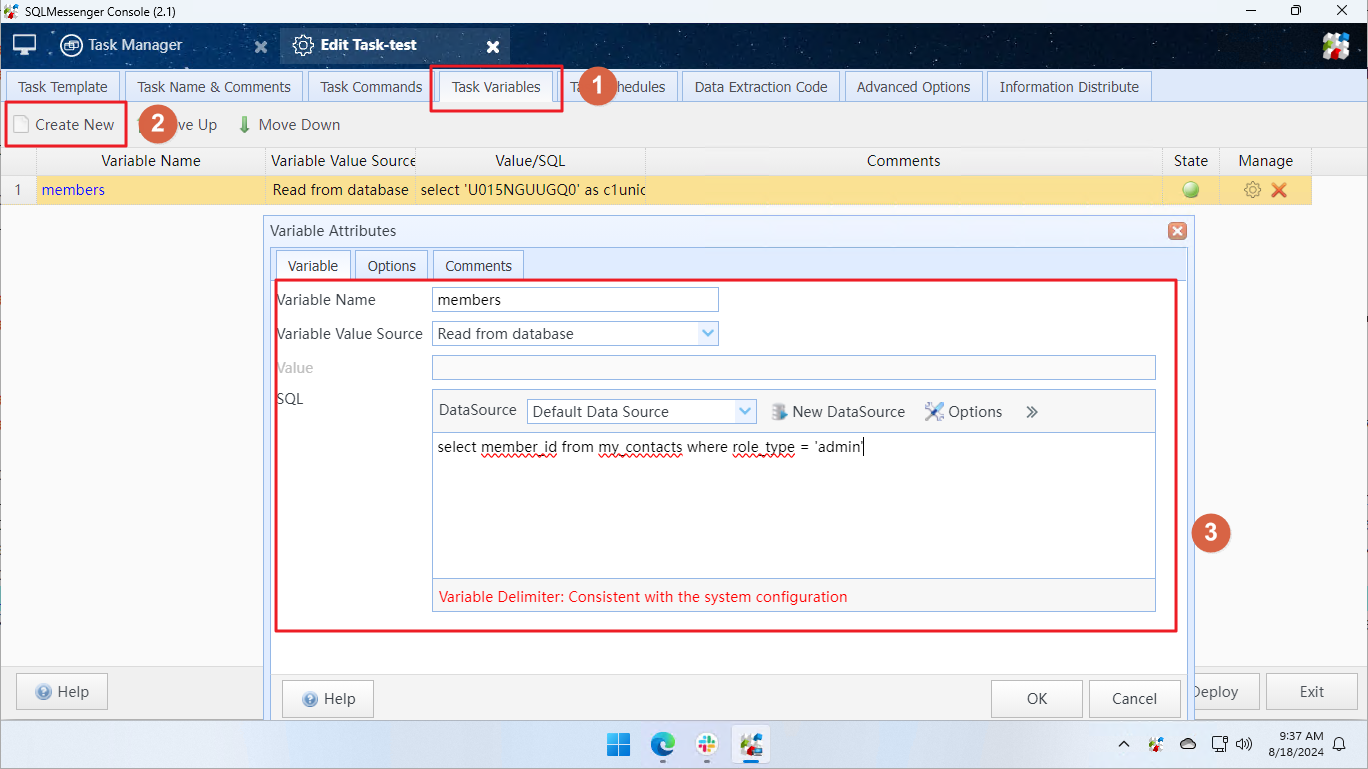
Tips: The variable value supports member IDs, channel names or member email addresses. To send messages to multiple recipients, separate member IDs with commas (e.g., "U015NGUUGXX,U07FF9K8AXX,project"). When pulling values from databases, Excel spreadsheets or CSV files, each row shall contain only one member ID or email address.
Step 2: When selecting task recipients, go to the Send to Slack tab in the dialog box, click Add From Variable on the right panel, then select the variable and Slack app for message sending.
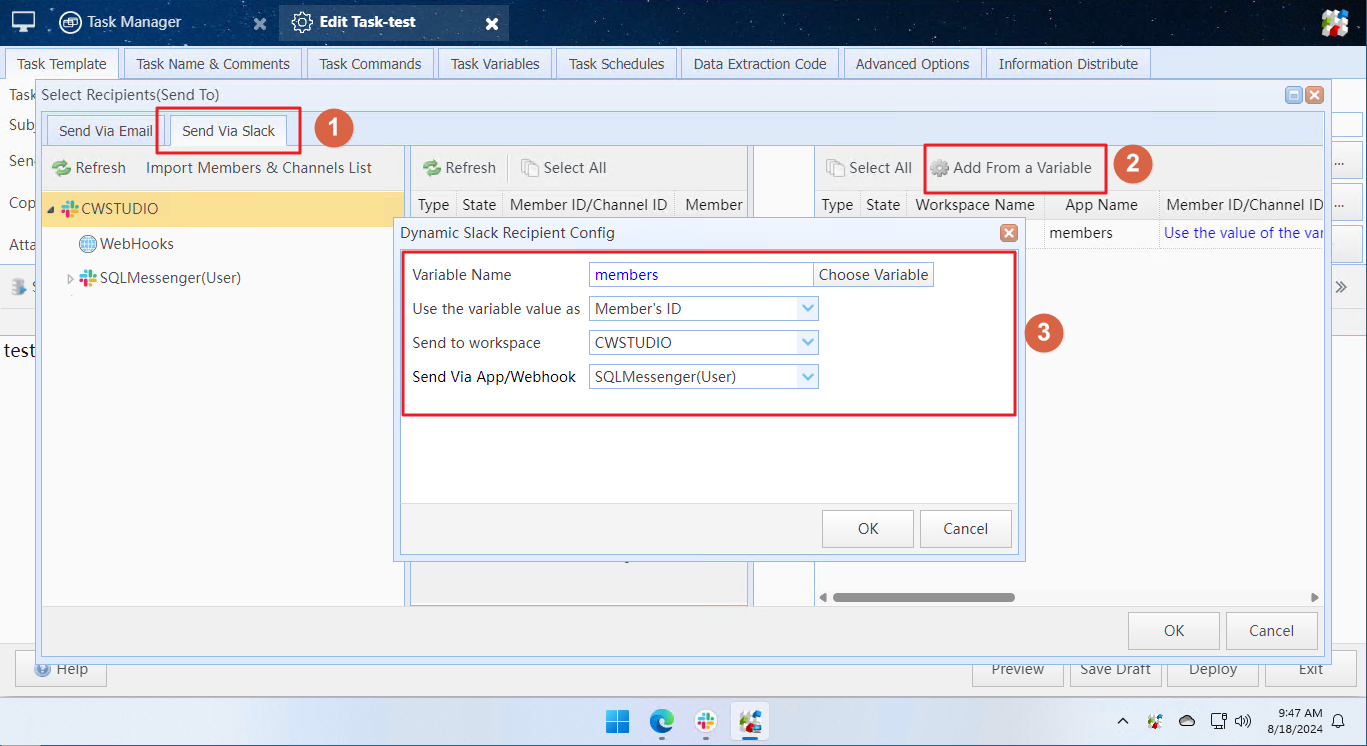
Options for Use Variable Value As:
| Member ID | The system identifies the variable value as either a Slack workspace member ID or a channel name. |
| Member Email Address |
The system recognizes the variable value as the email address of a Slack workspace member. It will then match and retrieve the corresponding member ID from the locally stored imported workspace member list. Tips: When this option is selected, you must re-import the latest member list into SQLMessenger whenever new members join or existing member details are updated. Failure to do so will result in unmatched email-to-ID records, making message delivery impossible. |
Related Document: Using Variables in Tasks, Using Information Distribution Task
6. Importing Slack Workspace Members & Channel Lists to Local Database
If you use variable-based Slack recipients and select the option Use Variable Value as Member Email Address, you need to import the updated workspace member list into the local database of SQLMessenger in a timely manner whenever workspace members or channels are modified.
Step 1: Click the Slack Apps Config icon in the MainMenu.
Step 2: Click the target workspace name, then switch to the Apps tab. Select a regular application (do not select any Webhook-type app). Navigate to the Members & Channels tab of the selected app, and click the Import Members & Channels List button.
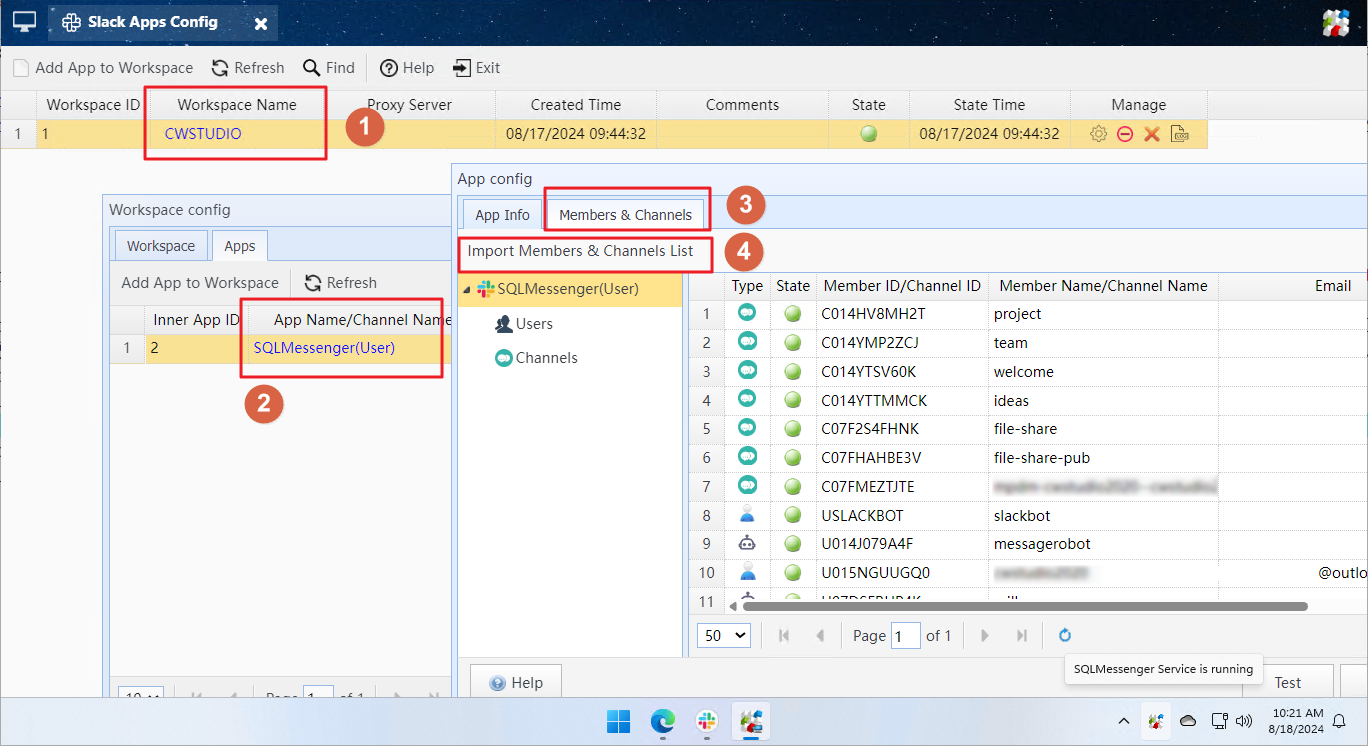
Tips: You only need to fetch data from one app per workspace, no need to retrieve data from every app.
After the workspace member list is successfully imported, it will be saved in the local PostgreSQL database used by SQLMessenger. You can query this list via the view user01.v_slack_workspace_members within SQLMessenger’s default data source. The fields contained in this view are described below.
| workspace_id | int | Unique internal workspace ID automatically generated by SQLMessenger. |
| workspace_name | text | The name of the Slack workspace. |
| member_id | text | Slack platform-generated unique member ID. |
| member_name | text | The name of the member. |
| mail_addr | text | Member email address. This field is unavailable for channels. |
| real_name | text | Member's full real name. |
| display_name | text | Member display name shown in Slack interface. |
| deleted | char(1) | Member status. Value 1 means the member is deactivated by admin. |
| slack_member_data | json | Raw Slack member profile data. Refer to official Slack API docs for field definitions and formats. |
7. Receiving and Processing Slack Messages
You can use SQLMessenger to receive incoming messages from Slack, and configure tasks to automatically process these messages.
For instance, upon receiving messages from team members, SQLMessenger can run different SQL queries according to message content, then send query results back as replies.
This section describes how to set up SQLMessenger for Slack message reception.
7.1 Configuring the Slack App and Enabling WebSocket Functionality
First, follow the steps below to create a Slack app and enable the Socket Mode option for it.
Step 1: Create a new Slack app and install it in your workspace. Click here to learn how to create a Slack app.
Step 2: In the app management page, click Socket Mode, then turn on the Enable Socket Mode switch.

Step 3: Enter a Token Name, then click Generate.

Step 4: Copy the generated Token and save it securely. You’ll need it later for configuration. Then click Done.

Note: This token acts as your app's Socket credential. Please keep it securely to avoid information leakage and potential risks.
Step 5: Click Event Subscriptions, then enable the Enable Events option.
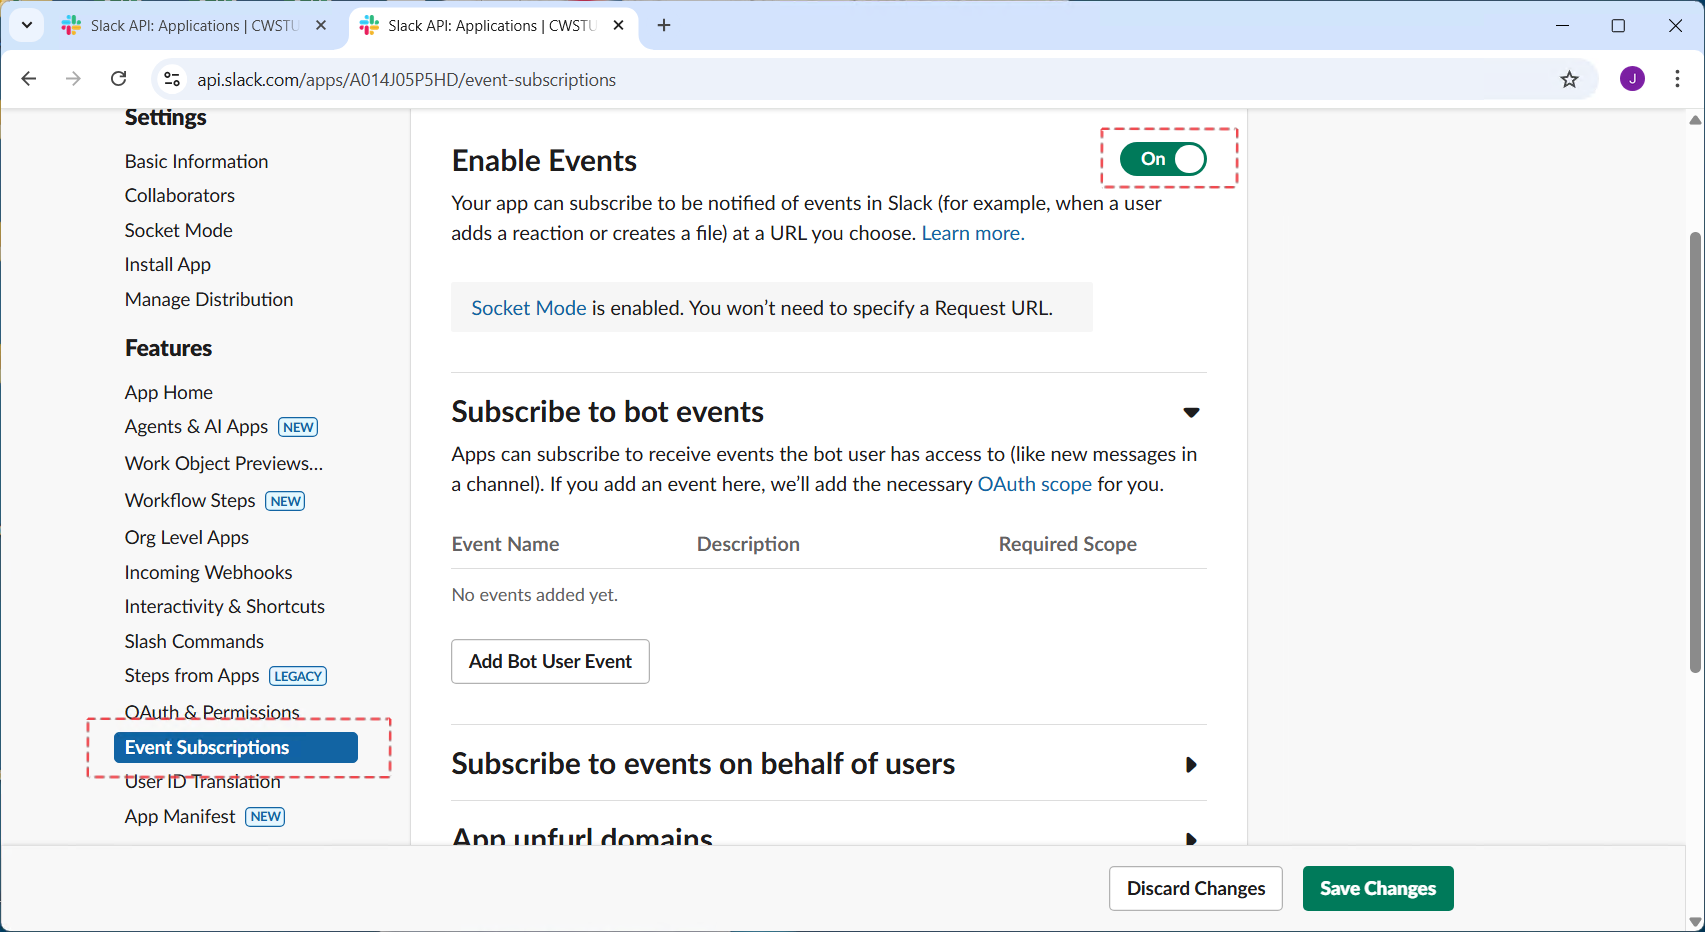
Step 6: Under Subscribe to bot events, subscribe the bot to the following events and click Save Changes:
message.channels,message.im,message.groups,message.mpim

Step 7: Click Reinstall your app to reinstall it in your workspace.

7.2 Configuring Slack App and WebSocket in SQLMessenger
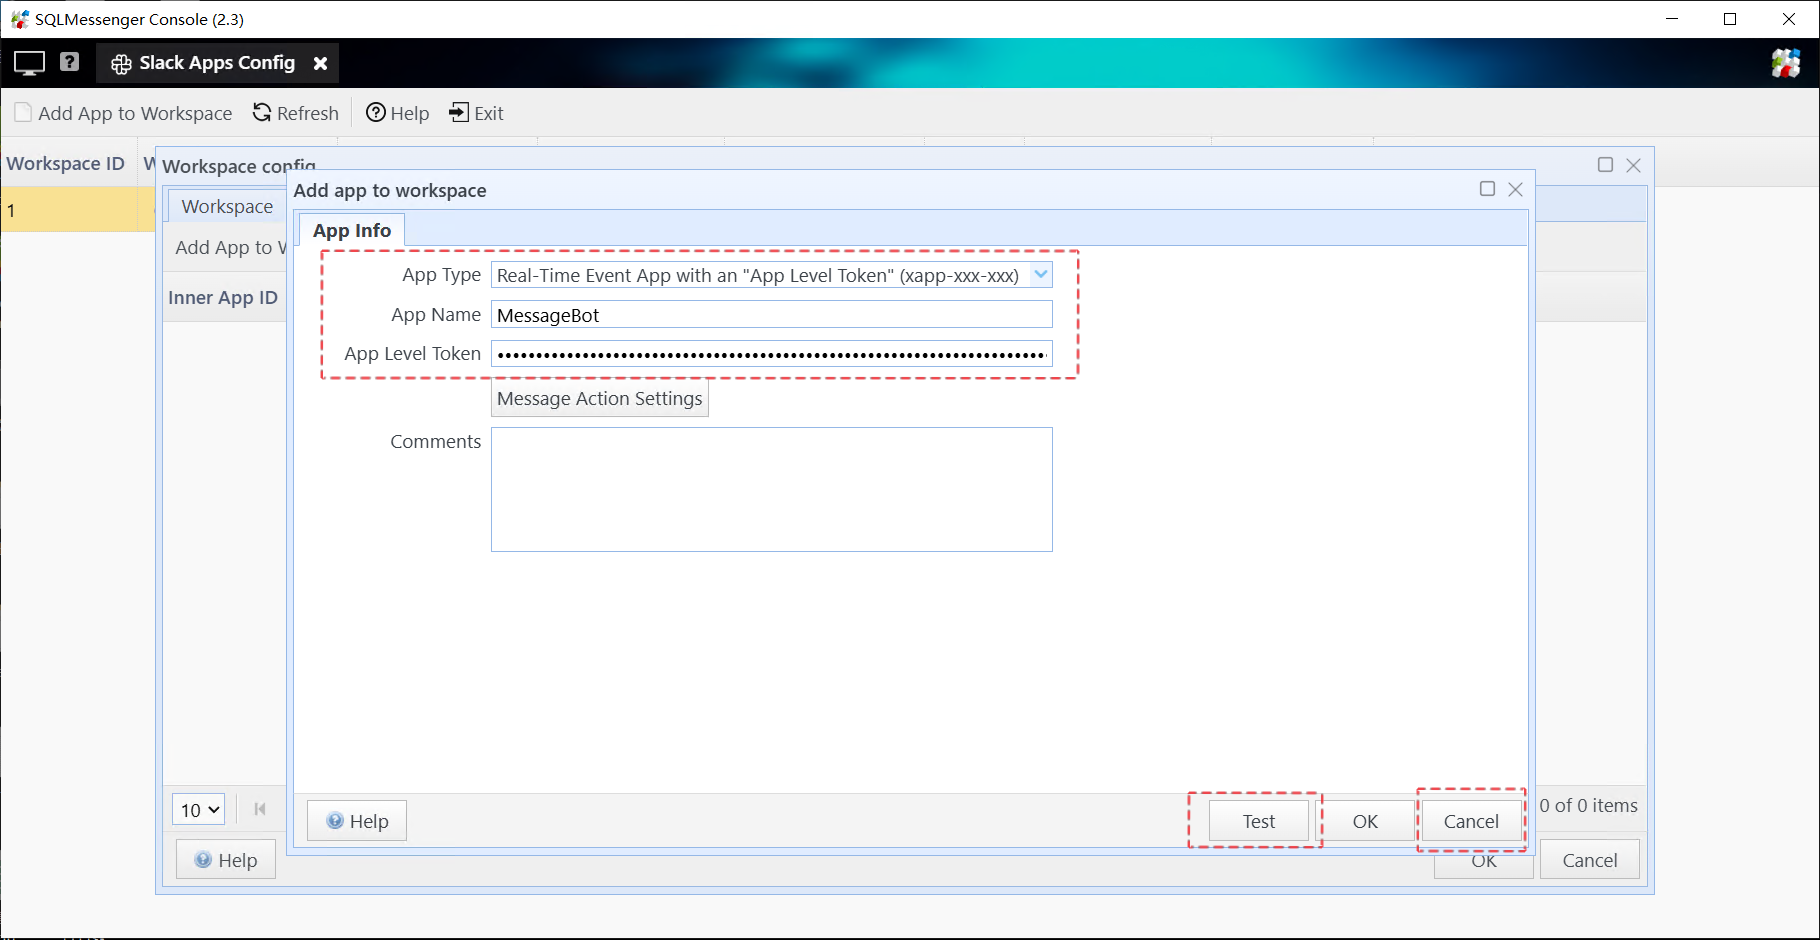
Step 1: Log in to the SQLMessenger console and click the Slack Apps Config icon in the MainMenu.
Step 2: In the workspace, click Apps, then click Add App to Workspace.
Step 3: Select Real-Time Event App with an App Level Token as the app type. Fill in the app name and token, then click Test. The system will establish a WebSocket connection to Slack via the entered token. Click OK once the test passes.
Once saved, SQLMessenger will establish a WebSocket connection to your Slack workspace to receive real-time messages.
7.3 Triggering Tasks When Messages Are Received
SQLMessenger can run designated tasks automatically upon receiving Slack messages to process incoming data.
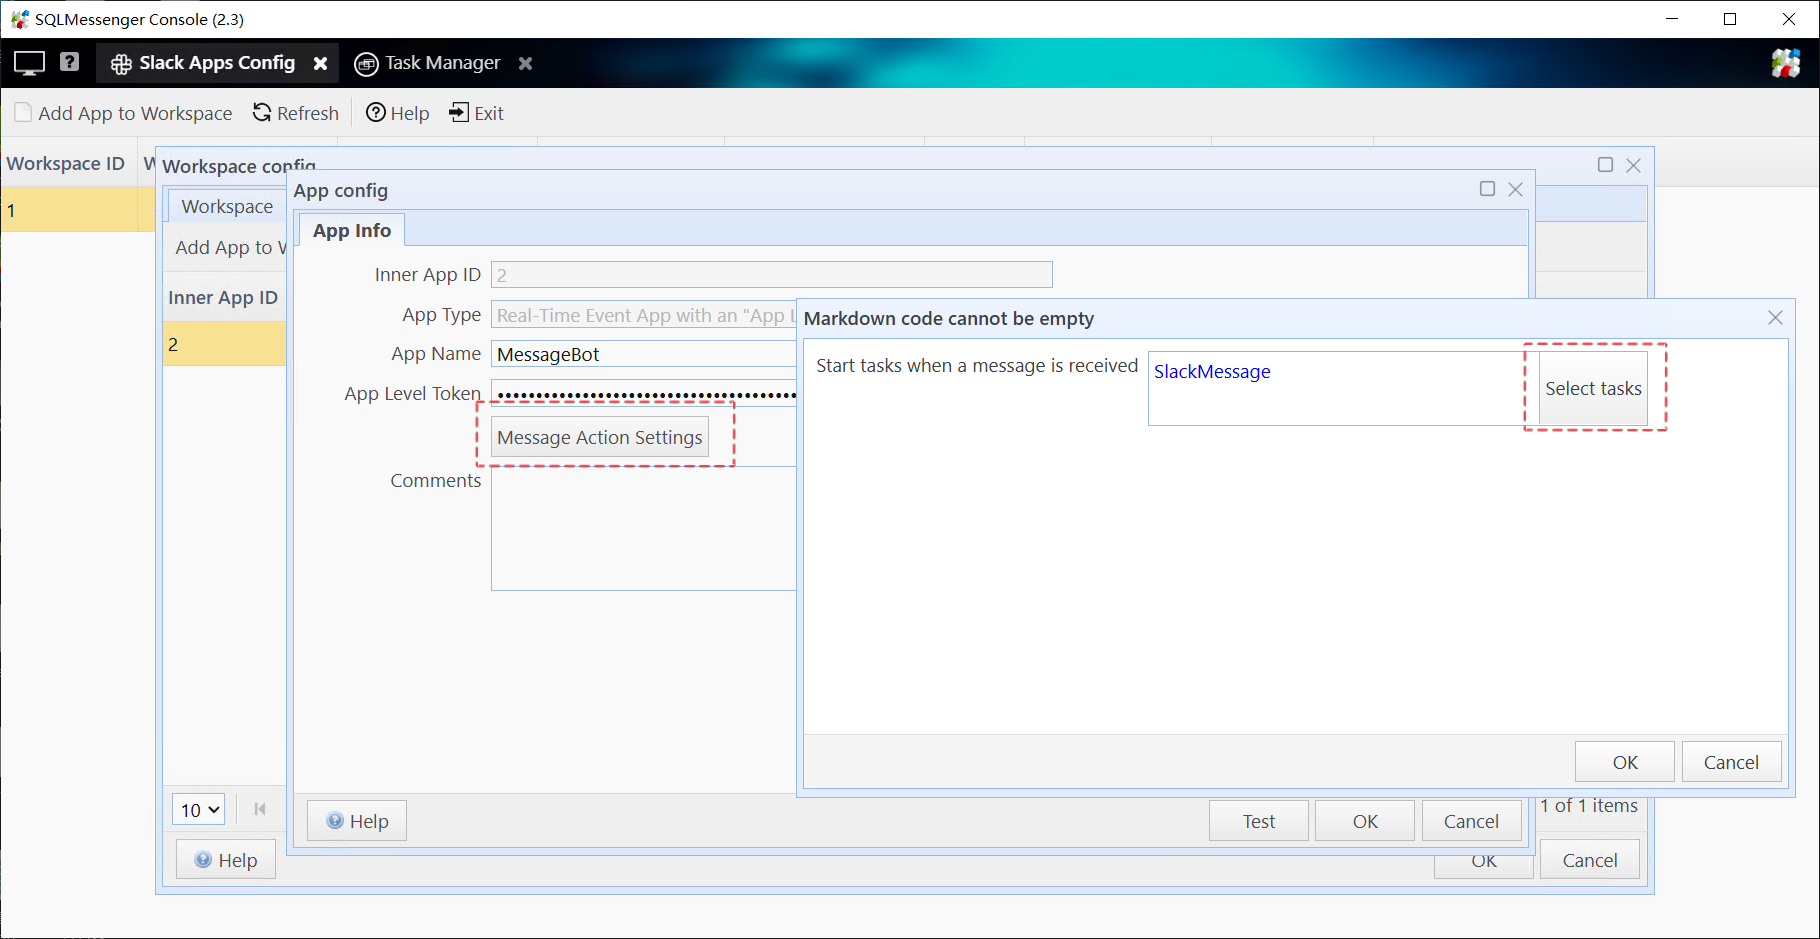
Within the task, you can use the @@MessageID variable to get the ID of the current message being processed.
You can then call the f_query_im_message function via SQLMessenger's default data source to fetch the full message content.
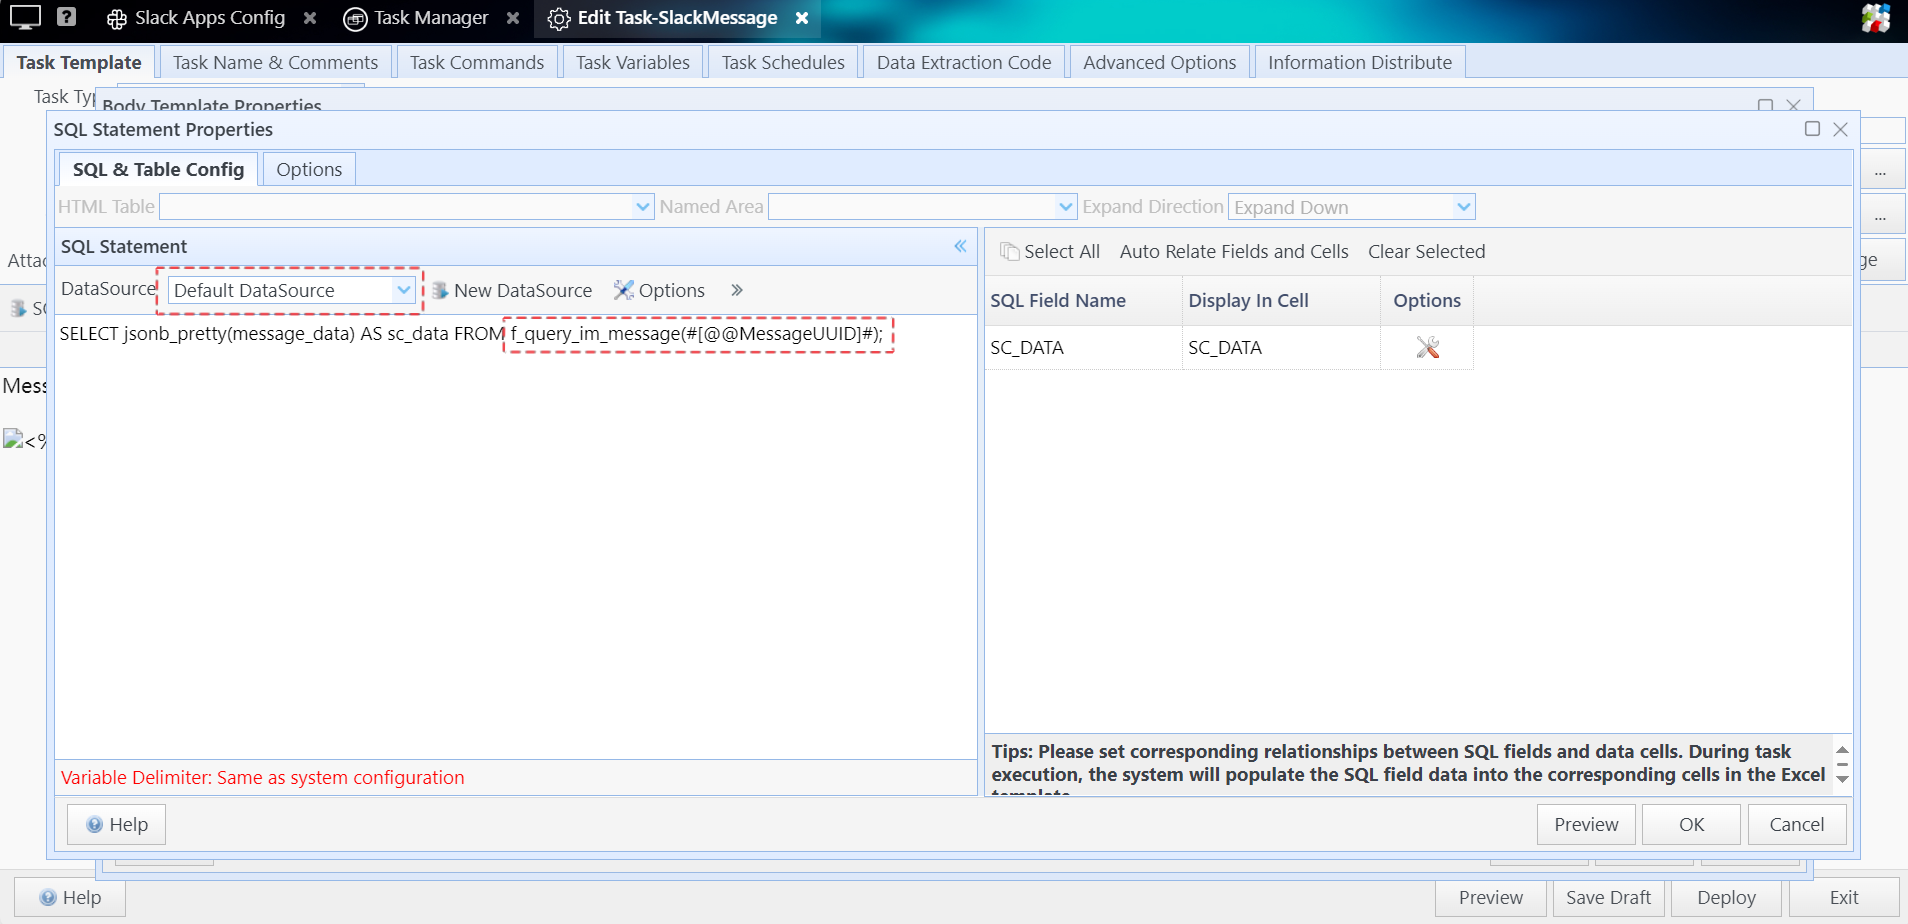
The fetched message content is in JSON format.
For detailed parsing instructions, refer to the official Slack API documentation: https://api.slack.com/reference/messaging/payload .

FAQ
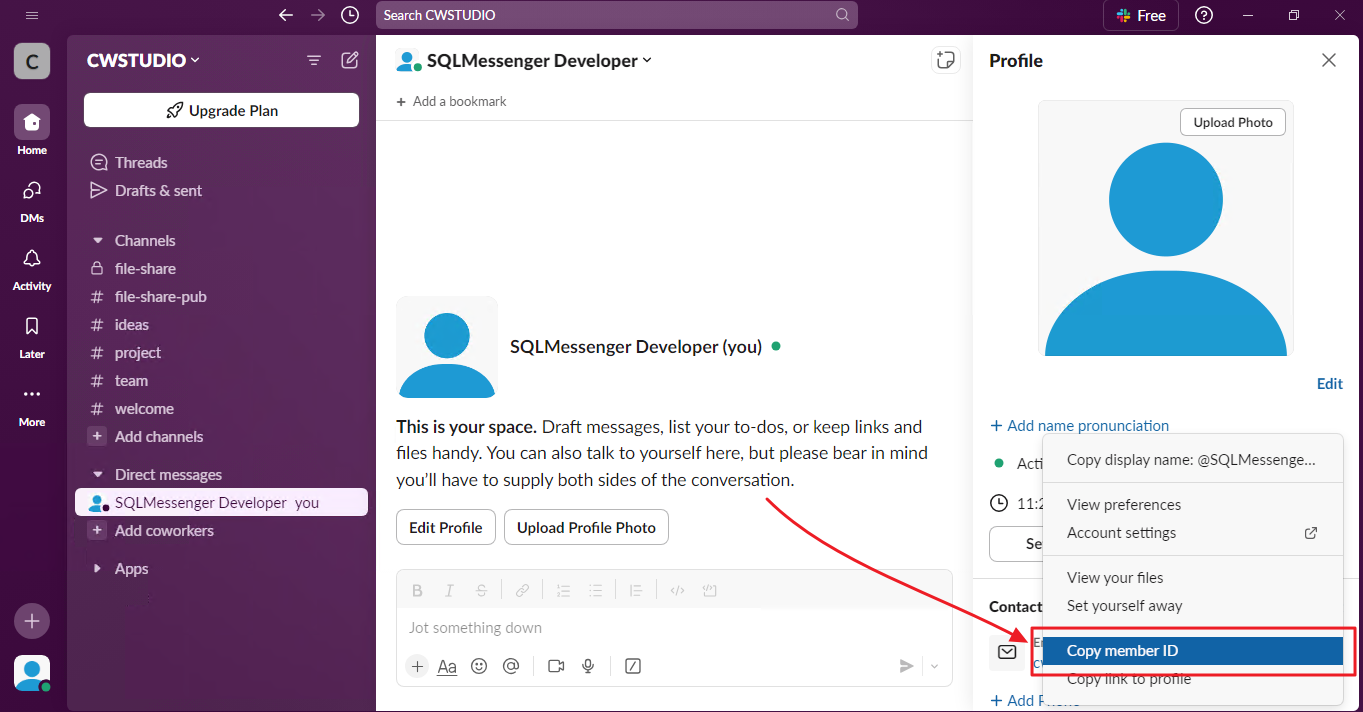
Q: Where can I find Slack workspace member ID?
A: You can copy the member ID directly from their profile panel.
Step 1: In Slack, click the member's profile picture, then tap the menu icon on the profile panel.
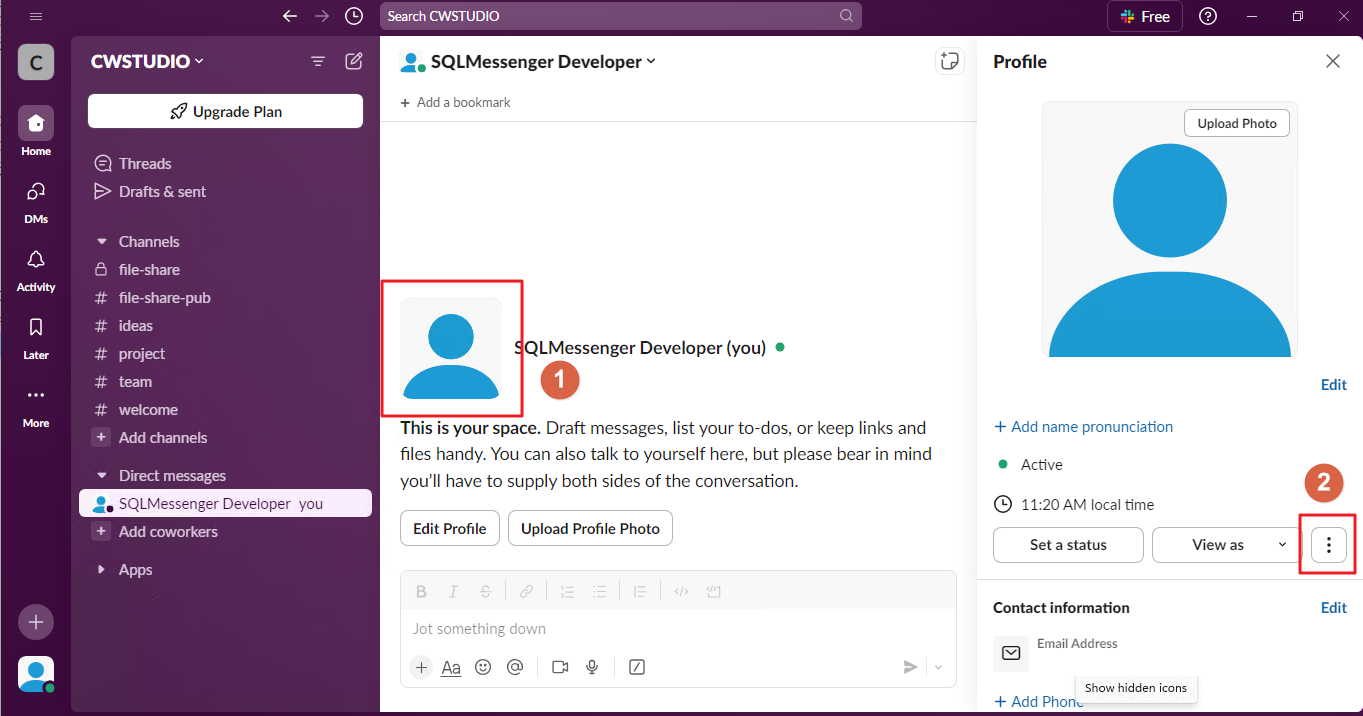
Step 2: Click Copy member ID to copy the member ID to your clipboard.
Q: How to send personalized messages to members in a Slack workspace?
A: You can use the Report Distribution feature in SQLMessenger for this purpose. For example, create an Excel file that contains each recipient's member ID and their respective exclusive message content.
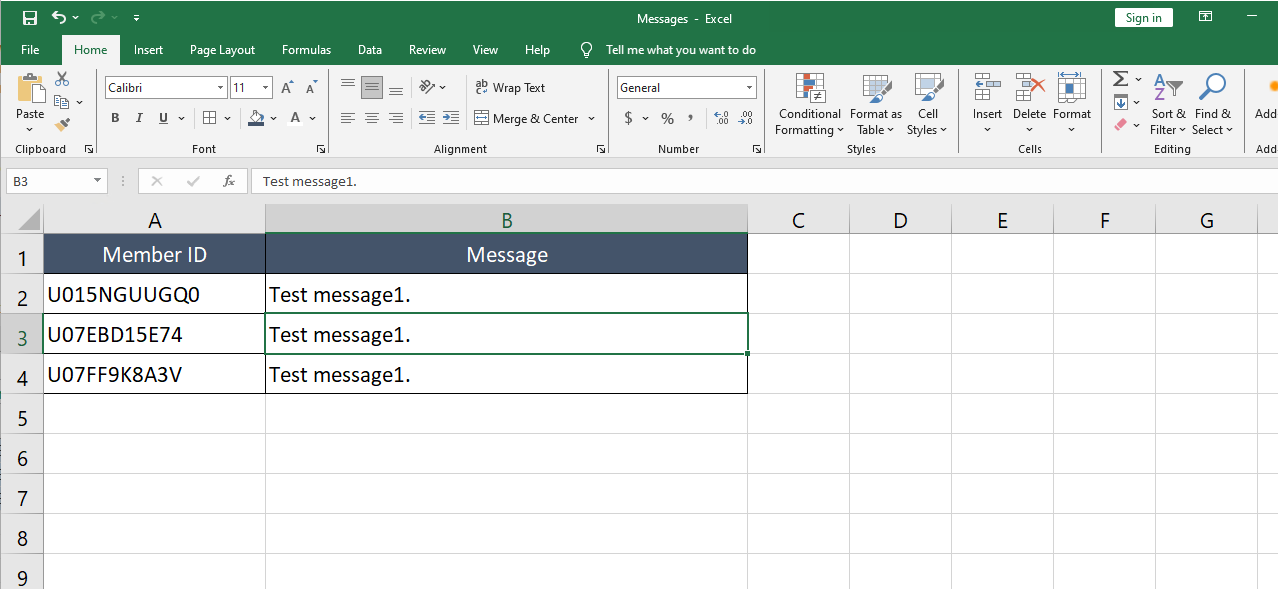
The table contains recipient member IDs and personalized messages
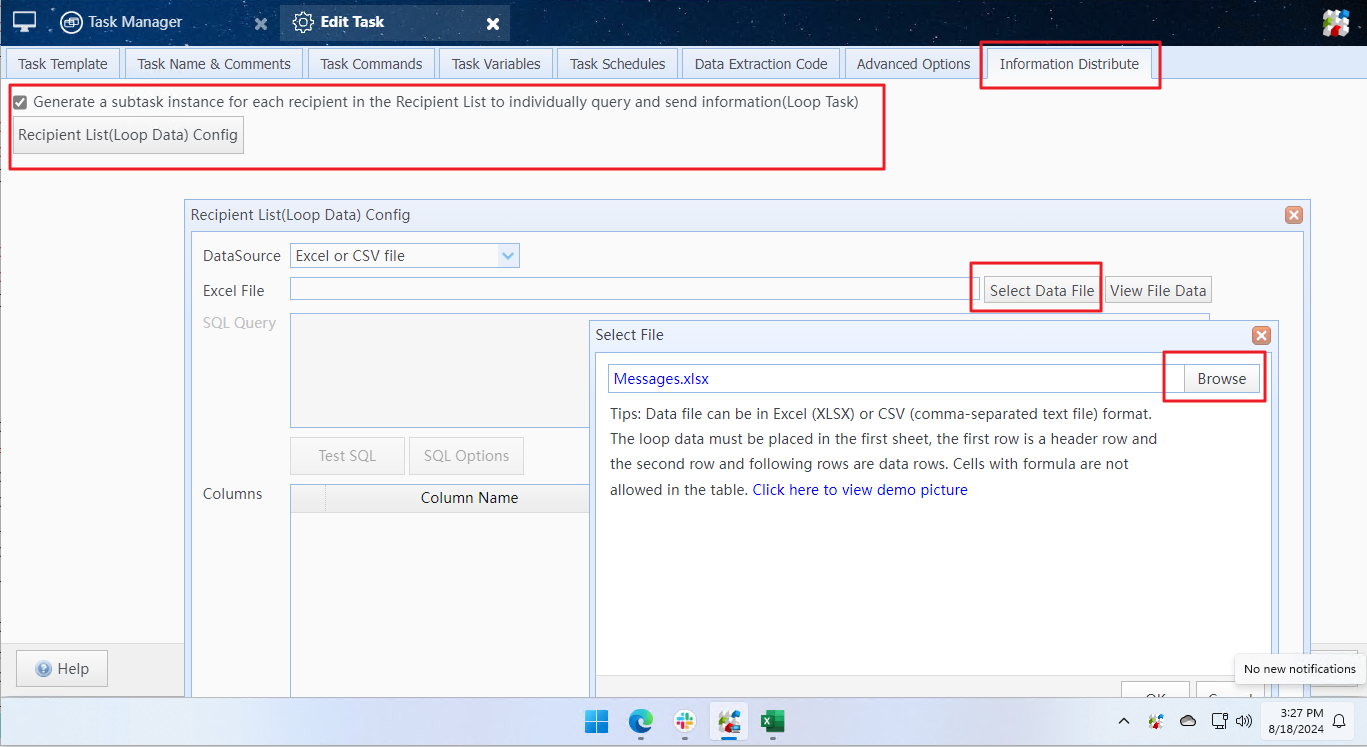
Step1: Create a new task, enable Report Distribution and import the table.
Step2: In the recipient selection dialog, under the Send to Slack tab, click the Add From Variable button on the right, then click Choose Variable.
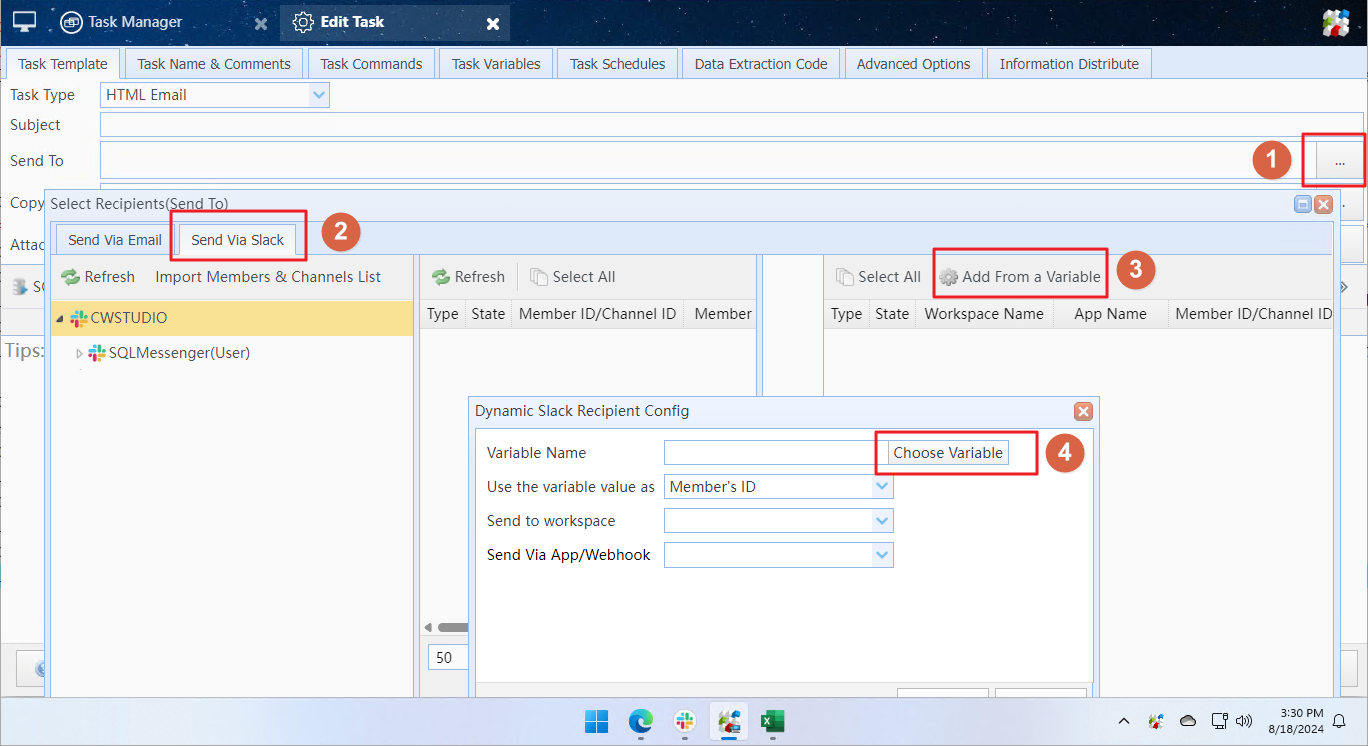
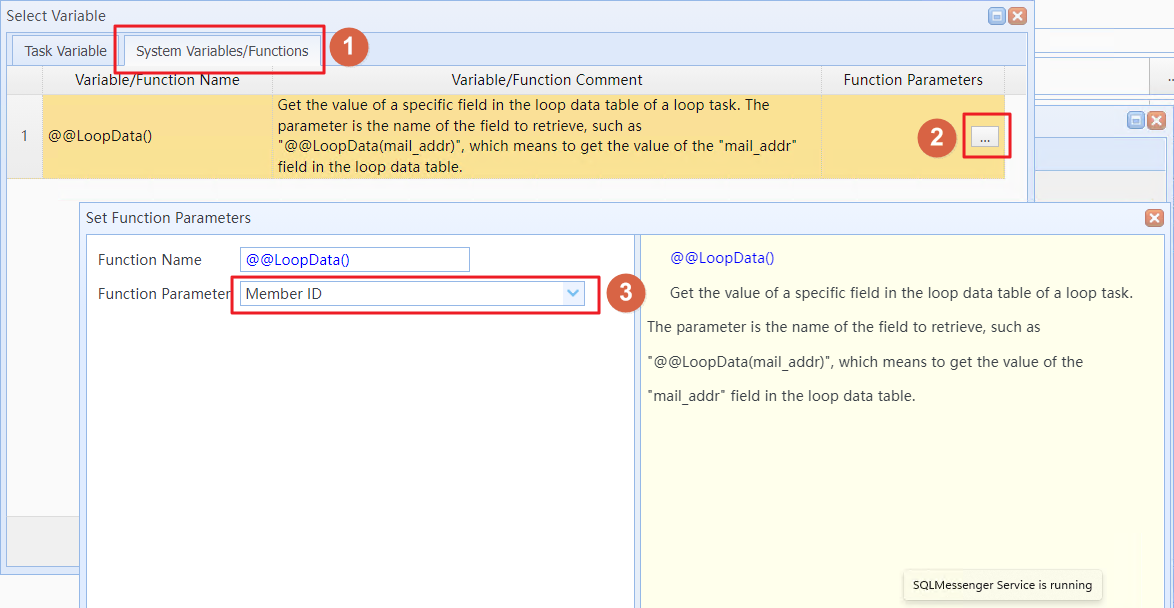
Step3: In the variable selection dialog, under the System Variables/Functions tab, click the button next to the @@LoopData() entry, and select Member ID as the Function Parameter.
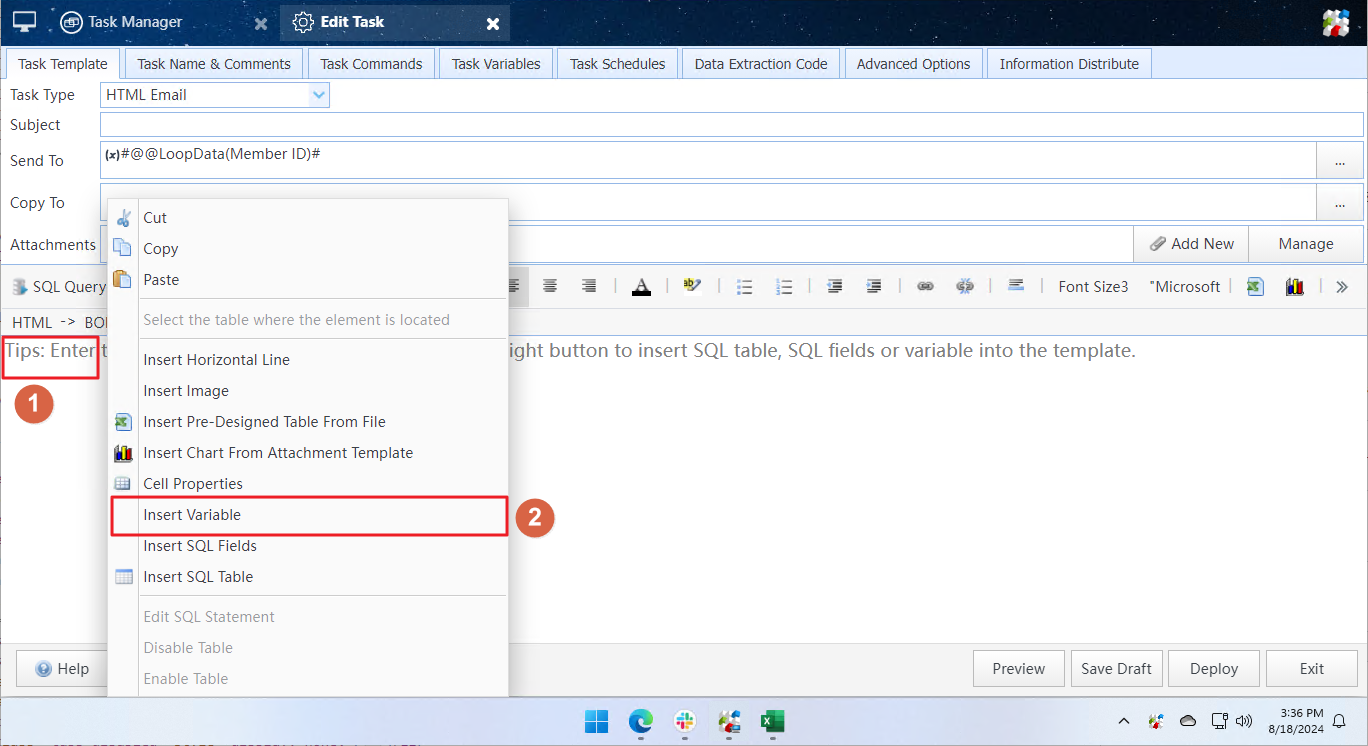
Step4: After clicking OK, return to the task configuration screen. In the body template editor, right-click and then click the Insert Variable menu.
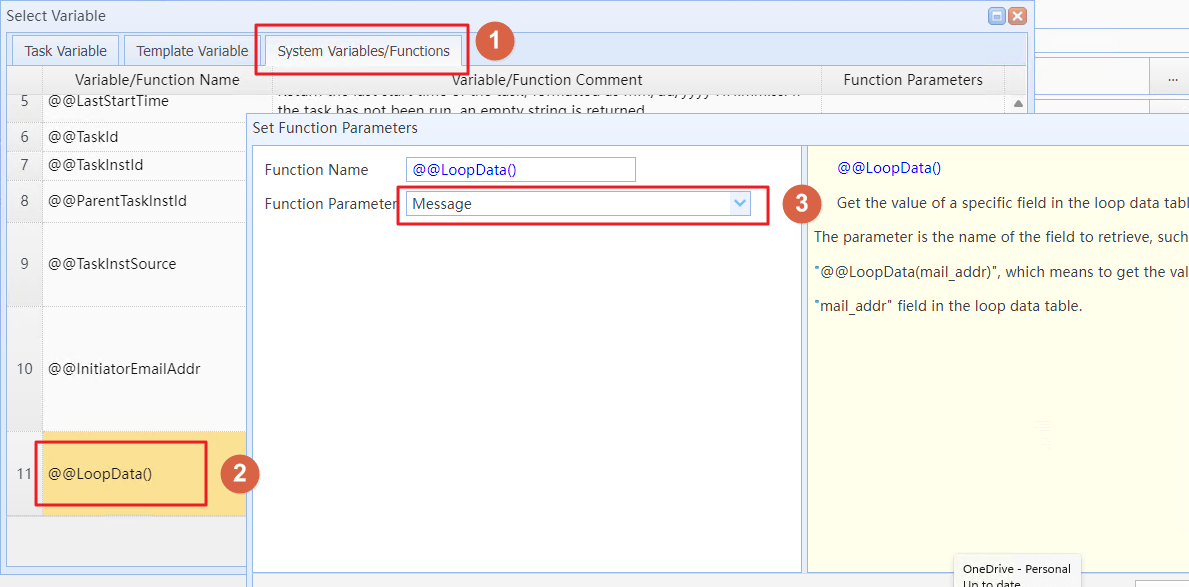
Step5: In the variable selection dialog, under the System Variables/Functions tab, find the @@LoopData() entry and click the button on the right, then select Member ID as the function parameter.
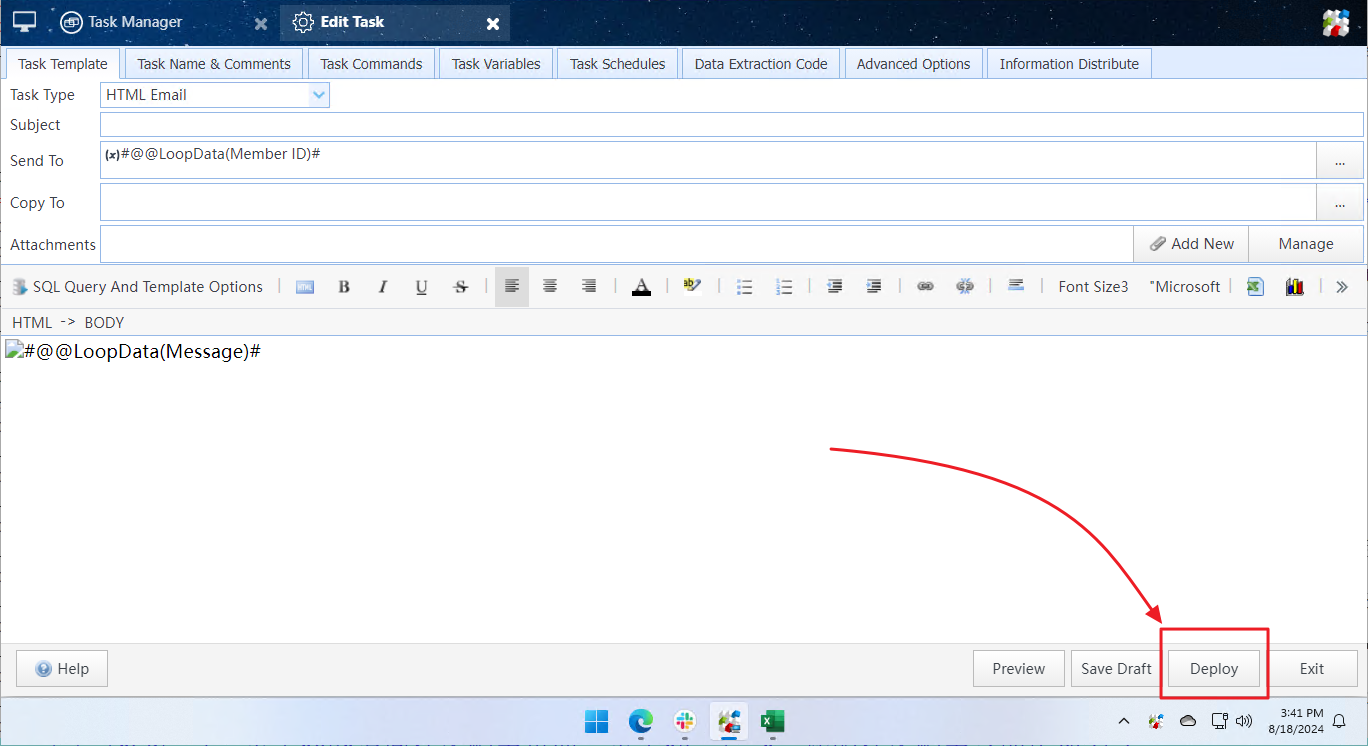
Step 6: Click OK to return to the task configuration screen, then click Deploy to apply the new task configuration immediately.
You only need to configure the task once, and it can be reused anytime later. When you need to send messages, right-click the task and select Run selected tasks immediately to start execution.
This method also supports one-on-one delivery of images, files, reports and other content to workspace members. Furthermore, SQLMessenger can automatically read report data from databases and complete distribution tasks.
Related Document: Using Variables in Tasks, Using Information Distribution Task